System Maintenance
API Profiles
The API Profiles form contains API fields, credential information, and settings for the various APIs available with Deacom including, FedEx, UPS, EasyPost and others. The form allows the addition of API multiple API Profiles. Note that in order to use FedEx, UPS, and EasyPost APIs, the Freight APIs license is required.
Note: Connections to APIs happen when the API Profile is saved.
System Navigation
System > Maintenance > API Profiles
API Profiles form
|
Field |
Description |
|---|---|
|
Display |
Displays active, inactive, or all API profiles, depending on the filter chosen when the via the "Display" button is first clicked. |
|
Activate All |
Activate all API Profiles displayed in the list. |
|
Deactivate All |
Deactivates all API Profiles displayed in the list. |
|
Export All |
If clicked, all API Profiles in the list will be downloaded to the browser's downloads location as encrypted .etf file types, consistent with individual exports.
|
Edit API Profile form
Displayed when using the "New" or "Modify" button on the form.
|
Field |
Description |
|---|---|
|
Sync All |
If clicked, all API Types for the Custom API category will be synced. |
|
Import/Export |
Allows users to export API Profiles into an encrypted ".etf" file. Those exports can then be imported into other systems.
|
|
Name |
Required. Enter the name of the API Profile. |
|
API Category |
Required. Defines the API Category type. Selection options are:
|
|
API Type |
Defines the specific API that will be defined on this form. The options depend on the selection made in the API Type field above. Note: API Types (Providers) will define the functionality around the External System syncing and monitoring.
|
|
Key /Authorization Code |
Required, except when using a type of "USPS". Displays as Authorization Code when choosing QuickBooks Online or Evolution X. This value is supplied by the vendor. This field is encrypted. |
|
Username |
Account username. Only available when using a type of Evolution X, FedEx, UPS, and USPS. |
|
Password |
Account password. Only available when using a type of Evolution X, FedEx, UPS, and USPS. This field is encrypted. |
|
Tax Company Code |
Option to define the company specific tax code. Only enabled when using a provider of “AvaTax”. |
|
Tax Line Name |
Defines the name/string that appears on the order lines when adding TaxJar or AvaTax taxes instead of standard taxes.
|
|
Ship Number |
Defines the shipping account number provided by the carrier, i.e. - UPS, FedEx. Only available when using a type of FedEx, UPS, and USPS. |
|
Meter Number |
Only available when using a type of "FedEx". |
|
Facility |
Only one record combination of "Type" and "Facility" may be set. |
|
URL |
When creating a new EvoX API profile this field is enabled and defaults to the production integration engine environment. |
|
Test / Sandbox Mode |
If checked, the API integration will operate in test mode. Transactions will not be processed, but users can see records/entries for orders. This field is disabled when using a Type of EasyPost. |
|
Active |
Check to make the API Profile active. |
|
Include Tax-Exempt Orders in Tax APIs |
Defaults to false, enabled only when Type = 'Follow Sales Options'. The transaction performed will be executed as tax exempt.
|
|
Auto Invoice With No Variance |
If checked , this profile can be used in connection with the AI Invoice feature in Deacom.
|
API Types form
Displays when clicking the "New" of "Modify" button and using an API Category of "Custom APIs"
Notes:
- Saving the "Edit API Profile" form is necessary in order to have API Types monitored (if this option is checked) and creation of triggers used to the API.
- For each table and operation that is defined on the External System Monitoring tab there should be a corresponding External Sync trigger as defined below in the attached. This is requires since SQL triggers are now added and removed from the Company/Docs/System databases based on the External Monitor records when the "Edit External System Monitoring" or "Edit API Type" forms are saved.
- When the API Profile is made Active, the system will check to see what, if any, monitoring requirements there are and then look to see if SQL triggers already exist for those tables. If not, the system add them.
- When the API Profile is made inactive or deleted, the system will check to see if there are any monitoring requirements and then look to see if SQL triggers exist for those tables. The system will also make sure there are no other active profiles that also require these same tables before attempting to delete the triggers.
General Tab
|
Field |
Description |
|---|---|
|
Name |
Required. Defines the name of the API Type |
|
API Category |
Read only. Will display "Custom API". |
|
Sync External |
Option to select an existing Deacom External Program that will be incorporated and synced with this API Type. |
|
Active |
Check to make the custom API Type active. |
|
Monitoring |
If checked, database tables associated with the API Type will be monitored when using the API. |
|
System |
Indicate this is a system created API Type and cannot be modified. |
External System Monitoring tab
External System Monitoring is used to build the triggers for monitoring Deacom transactions that will be synced to the external system. This tab can only be modified when using an API Category of "Custom APIs". Also, it is not possible to edit External Sync Monitoring entries until the linked API Type saved for the first time.
|
Field |
Description |
|---|---|
|
API Type |
Read only. Copy of the value in the "Name" field on the General tab. |
|
Sync Table |
Define the Deacom system table to be synced. Defaults to"None". |
|
Sync Filter |
Option to define a user-defined statement that will be evaluated when filter information for the API Type. |
|
Sync Schedule |
Option to set the schedule time for this API Type.
|
|
Sync Action |
Defines the action / action statement that will be evaluated when filtering information for the API Type.
|
|
Action |
If clicked, opens the "Sync Action" field for entry. The system will evaluate the "Sync Action" field when syncing. |
|
Create |
If clicked, will create a new entry, based on the "Sync Filter", in the monitored, synced table. |
|
Update |
If clicked, will update the monitored, synced table based on the "Sync Filter. |
|
Delete |
If clicked, will delete the monitored, synced table based on the "Sync Filter. |
|
Active |
Check to make the External System Monitoring profile active. |
Application Identifiers
Application Identifiers (AI) are used in connection with GS1-128 barcodes. AIs may be encoded in a single symbol to allow, for example, serial numbers, sell-by dates, and other information to be automatically evaluated in the barcode. The purpose of the form on this page is to exclude or remap selected AIs that may cause conflicts when scanning/reading data into Deacom. The form allows for two options:
- Exclude an AI when it is scanned into Deacom.
- Remap an AI to another AI.
Concerning remaps:
- There may be multiple remaps for the same AI (ex: AI 21 goes to AI 21 and to AI 10).
- To remap an AI, the value input and size (if static) must be valid for both the original and remapped AI.
System Navigation
- System > Maintenance > Application Identifiers
Available AIs
This list contains several of the most commonly used Application Identifiers. For a complete list, contact your GS1 organization. Note: The main Deacom application and Deacom mobile applications, such as Direct Store Delivery (DSD) and Warehouse Management System (WMS), will not take into consideration barcoded AI's that are not supported by the Deacom system. In this case, the system will still accept the barcode and supported AI's/data while ignoring non-supported AI numbers. Deacom-supported AI's are indicated in bold.
|
AI |
Length |
FNC1 |
Format |
Name |
|||
|
00 |
18 |
|
Numeric |
SSCC (Serial Shipping Container Code) |
|||
|
01 |
14 |
|
Numeric |
Global Trade Item Number |
|||
|
02 |
14 |
|
Numeric |
GTIN of Trade Items Contained in a logistic unit |
|||
|
10 |
<=20 |
Yes |
Alpha-numeric |
Batch or Lot Number |
|||
|
11 |
|
|
Numeric-YYMMDD |
Production or Vendor date |
|||
|
12 |
6 |
|
Numeric-YYMMDD |
Due date |
|||
|
13 |
6 |
|
Numeric-YYMMDD |
Packaging date |
|||
|
15 |
6 |
|
Numeric-YYMMDD |
Best before date |
|||
|
17 |
6 |
|
Numeric-YYMMDD |
Expiration date |
|||
|
20 |
2 |
|
Numeric |
Product variant |
|||
|
21 |
<=20 |
Yes |
Alpha-numeric |
Serial number |
|||
|
22 * |
<=29 |
Yes |
Alpha-numeric |
Secondary data for specific health industry products |
|||
|
240 |
<=30 |
Yes |
Alpha-numeric |
Additional product identification assigned by the manufacturer |
|||
|
241 |
<=30 |
Yes |
Alpha-numeric |
Customer part number |
|||
|
242 |
<=6 |
Yes |
Numeric |
Made-to-Order Variation Number |
|||
|
250 |
<=30 |
Yes |
Alpha-numeric |
Secondary serial number |
|||
|
251 |
<=30 |
Yes |
Alpha-numeric |
Reference to source entity |
|||
|
252 |
2 |
|
Numeric |
Global Identifier Serialized for Trade |
|||
|
253 |
<=30 |
Yes |
Numeric 3 + Numeric <=17 |
Global Document Type Identifier |
|||
|
254 |
<=20 |
Yes |
Alpha-numeric |
GLN Extension component |
|||
|
30 |
<=8 |
Yes |
Numeric |
Variable count |
|||
|
310d-369d |
6 |
|
Numeric |
Trade and Logistic Measurements |
|||
|
310 |
6 |
|
Numeric |
Net weight, Kilograms (kg) |
|||
|
320 |
6 |
|
Numeric |
Net weight, Pounds (lb) |
|||
|
337d |
6 |
|
Numeric |
Kilograms per square meter (KG / m2) |
|||
|
37 |
<=8 |
Yes |
Numeric |
Count of trade items contained in a logistic unit |
|||
|
390d |
<=15 |
Yes |
Numeric |
Amount payable – single monetary area |
|||
|
391d |
<=18 |
Yes |
Numeric 3 + Numeric <=15 |
Amount payable – with ISO currency code |
|||
|
392d |
<=15 |
Yes |
Numeric |
Amount payable for a Variable Measure Trade Item – single monetary unit |
|||
|
393d |
<=18 |
Yes |
Numeric 3 + Numeric <=15 |
Amount payable for a Variable Measure Trade Item – with ISO currency code |
|||
|
400 |
<=30 |
Yes |
Alpha-numeric |
Customer's order number (May also represent job order number) This AI can be used to add the Deacom Sales Order or Job number.
|
|||
|
401 |
<=30 |
Yes |
Alpha-numeric |
Consignment number |
|||
|
402 |
17 |
|
Numeric |
Shipment Identification Number |
|||
|
403 |
<=30 |
Yes |
Alpha-numeric |
Routing code |
|||
|
410 |
13 |
|
Numeric |
Ship to - deliver to Global Location Number |
|||
|
411 |
13 |
|
Numeric |
Bill to - invoice to Global Location Number |
|||
|
412 |
13 |
|
Numeric |
Purchased from Global Location Number |
|||
|
413 |
13 |
|
Numeric |
Ship for - deliver for - forward to Global Location Number |
|||
|
414 |
13 |
|
Numeric |
Identification of a physical location Global Location Number |
|||
|
415 |
13 |
|
Numeric |
Global Location Number of the Invoicing Party |
|||
|
420 |
<=20 |
Yes |
Alpha-numeric |
Ship to - deliver to postal code within a single postal authority |
|||
|
421 |
<=12 |
Yes |
Numeric 3 + Alpha-numeric <=9 |
Ship to - deliver to postal code with Three-Digit ISO country code |
|||
|
422 |
3 |
|
Numeric |
Country of origin of a trade item Three-Digit ISO country code |
|||
|
423 |
<=15 |
Yes |
Numeric 3 + Alpha-numeric <=12 |
Country of initial processing |
|||
|
424 |
3 |
|
Numeric |
Country of processing |
|||
|
425 |
3 |
|
Numeric |
Country of disassembly |
|||
|
426 |
3 |
|
Numeric |
Country covering full process chain |
|||
|
7001 |
13 |
|
|
NATO stock number |
|||
|
7002 |
<=30 |
Yes |
Alpha-numeric |
UN/ECE meat carcasses and cuts classification |
|||
|
703n |
<=30 |
Yes |
Numeric 3 + Alpha-numeric <=27 |
Approval number of processor with ISO country code (Processor # n4) |
|||
|
7003 |
10 |
|
Numeric – YYMMDDHHMM |
Expiration Date and Time |
|||
|
8001 |
14 |
|
Numeric |
Roll products - width, length, core diameter, direction, and splices |
|||
|
8002 |
<=20 |
Yes |
Alpha-numeric |
Electronic serial identifier for cellular mobile telephones |
|||
|
8003 |
<=30 |
Yes |
Numeric 14 + Alpha-numeric <=16 |
Global Returnable Asset Identifier |
|||
|
8004 |
<=30 |
Yes |
Alpha-numeric |
Global Individual Asset Identifier |
|||
|
8005 |
6 |
|
Numeric |
Price per unit of measure |
|||
|
8006 |
18 |
|
Numeric 14 + 2 + 2 |
Identification of the component of a trade item |
|||
|
8007 |
<=30 |
Yes |
Alpha-numeric |
International Bank Account Number |
|||
|
8008 |
<=12 |
Yes |
Numeric 8 + <=4 – YYYYMMDDHHMM |
Date and time of production |
|||
|
8018 |
18 |
|
Numeric |
Global Service Relation Number |
|||
|
8020 |
<=20 |
Yes |
Alpha-Numeric |
Payment Slip Reference Number |
|||
|
8100 |
6 |
|
Numeric 1 + 5:: |
GS1-128 Coupon Extended Code - NSC + Offer Code |
|||
|
8101 |
10 |
|
Numeric 1 + 5 + 4 |
GS1-128 Coupon Extended Code - NSC + Offer Code + end of offer code |
|||
|
8102 |
2 |
|
Numeric 1 + 1 |
GS1-128 Coupon Extended Code – NSC |
|||
|
90 |
|
|
Alpha-numeric |
Information mutually agreed between trading partners (including FACT DIs). Deacom uses this for item number and as a substitute when AI 01 or AI 02 are not available |
|||
|
91, 93* |
<=90 |
Yes |
Alpha-numeric |
Company internal information (user-definable). These have not been implemented for a specific function in Deacom. |
|||
|
94 |
<=30 |
Yes |
Alpha-numeric |
Deacom Master lot |
|||
|
95 |
<=30 |
::Yes:: |
Alpha-numeric |
Deacom Location |
|||
|
96 |
<=30 |
Yes |
Alpha-numeric |
Deacom System lot |
|||
|
97 |
<=30 |
Yes |
Alpha-numeric |
Deacom Lot Attribute 1 |
|||
|
98 |
<=30 |
Yes |
Alpha-numeric |
Deacom Lot Attribute 2 |
|||
|
99 |
<=30 |
Yes |
Alpha-numeric |
Deacom Lot Attribute 3 |
|||
n
= additional number required for code
d = indicates number of decimals in the data: (3102)341200 = 3,412 kg, (3104)341200 = 34.12 kg
* GS1 has established 01/01/2013 as the sunset date for AI 22
Notes:
- The main Deacom application and Deacom mobile applications, such as the DSD application and WMS, will not take into consideration barcoded AI's that are not supported by the Deacom system. In this case, the system will still accept the barcode and supported AI's / data while ignoring non-supported AI numbers.
- The system will store values scanned in with AI 91 into the notes field when issuing to a Master Lot in WMS.
- Certain AIs may be excluded or remapped in Deacom via System > Maintenance > Application Identifiers.
- The use of AI 11 (Production Date) in barcodes may be useful for items that have short shelf lifes. If AI 11 is not used in scanning, users will need to manually enter a production date or accept the default date of today for the lot.
- AI 250 (Secondary serial number) should be used for the container serial number in Barcodes.
Required pairs of AIs
|
If this AI |
and Name |
Then this AI |
Comment |
||||
|
01 or 02 with N1 = 9 |
Identification of a Variable Measure Trade Item |
30, 3nnn* or 3nnn** or 8001 |
Mandatory association with variable measure Information. Only GS1-128, ITF-14, and GS1 DataBar Expanded BarCodes can encode a GTIN with N1 = 9 |
||||
|
02 |
Identification of logistic unit contents |
00 |
Mandatory association with an SSCC (Serial Shipping Container Code) |
||||
|
02 |
Identification of logistic unit contents |
37 |
Mandatory count of the contained trade items |
||||
|
10 |
Batch/lot number |
01, 02, or 90# |
Mandatory association with a Global Trade Item Number (GTIN) or with the identification of logistic unit contents |
||||
|
11, 13, 15, 17 |
Dates |
01, 02, or 90# |
Mandatory association with a GTIN or with the identification of logistic unit contents |
||||
|
12 |
Due date |
8020 and 415 |
Mandatory association with the payment slip reference number and the Global Location Number (GLN) of the invoicing party |
||||
|
20 |
Product variant |
01, 02, or 90# |
Mandatory association with a GTIN or with the identification of logistic unit contents |
||||
|
21 |
Serial Number |
01 or 90# |
Mandatory association with a GTIN of a single trade item (a serial number cannot apply to a grouping of trade items). SGTIN is a common term for the mandatory association of AI (21) with GTIN AI (01) |
||||
|
22* |
Secondary data health industry |
01 or 90# |
Mandatory association with a GTIN. |
||||
|
240 |
Additional product identification |
01, 02, or 90# |
Mandatory association with a GTIN or with the identification of logistic unit contents |
||||
|
241 |
Customer part Number |
01, 02, or 90# |
Mandatory association with a GTIN or with the identification of logistic unit contents |
||||
|
242 |
Made-to-Order Variation Number |
01 or 02 with N1 = 9 |
Mandatory association with a GTIN-14 with Indicator Digit 9 represents a Custom Industrial Supply Item |
||||
|
250 |
Secondary serial number |
01 or 90# |
Mandatory association with a GTIN (a secondary serial number cannot apply to a grouping of trade items) |
||||
|
251 |
Reference to source entity |
01 or 90# |
Mandatory association with GTIN of the trade item |
||||
|
254 |
Extension component of a GLN |
414 |
Mandatory association with AI (414). Only GS1-128, GS1 DataBar Expanded symbologies, and EPC RFID tags are valid. This is used with GLN and not GTIN. |
||||
|
30 |
Variable Count |
01, 02, or 90# |
Mandatory association with a variable measure GTIN (e.g., a GTIN-14 starting with the digit 9) or the identification of variable measure content of a logistic unit |
||||
|
3nnn** |
Trade measures that cannot be summed |
01 or 90# |
Mandatory association with a variable measure GTIN (e.g., a GTIN-14 starting with the digit 9) |
||||
|
3nnn*** |
Trade measures that can be summed |
01, 02, or 90# |
Mandatory association with a variable measure GTIN (e.g., a GTIN-14 starting with the digit 9) or the identification of variable measure content of a logistic unit |
||||
|
3nnn**** |
Logistic Measures |
00 or 02 or 90# |
Mandatory association with an SSCC or a variable measure GTIN (e.g., a GTIN-14 starting with the digit 9) |
||||
|
337n |
Kilograms per square meter |
01 or 90# |
Mandatory association with a GTIN |
||||
|
37 |
Count of units Contained |
02 or 90# |
Mandatory association with the identification of logistic unit contents |
||||
|
390n |
Amount payable – single monetary area |
8020 and 415 |
Mandatory association with the payment slip reference number and the GLN of the invoicing party |
||||
|
391n |
Amount payable – with ISO currency code |
8020 and 415 |
Mandatory association with the payment slip reference number and the GLN of the invoicing party |
||||
|
392n |
Amount payable – single monetary unit |
01 or 90# |
Mandatory association with variable measure GTIN (e.g., a GTIN-14 starting with the digit 9) |
||||
|
393n |
Amount payable – with ISO currency code |
01 or 90# |
Mandatory association with variable measure GTIN (e.g., a GTIN-14 starting with the digit 9) |
||||
|
403 |
Routing code |
00 |
Mandatory association with an SSCC |
||||
|
415 |
GLN of the invoicing party |
8020 |
Mandatory association with payment slip reference number |
||||
|
422 |
Country of origin |
01, 02, or 90# |
Mandatory association with a GTIN |
||||
|
423 |
Country of initial processing |
01, 02, or 90# |
Mandatory association with a GTIN or with the identification of logistic unit contents |
||||
|
424 |
Country of processing |
01, 02, or 90# |
Mandatory association with a GTIN or with the identification of logistic unit contents |
||||
|
425 |
Country of disassembly |
01, 02, or 90# |
Mandatory association with a GTIN or with the identification of logistic unit contents |
||||
|
426 |
Country of full processing |
01, 02, or 90# |
Mandatory association with a GTIN or with the identification of logistic unit contents |
||||
|
7001 |
NATO stock number |
01, 02, or 90# |
Mandatory association with a GTIN or with the identification of logistic unit contents |
||||
|
7002 |
UN/ECE meat carcasses and cuts classification |
01, 02, or 90# |
Mandatory association with a GTIN or with the identification of logistic unit contents |
||||
|
7004 |
Active Potency |
01 or 90# and 10 |
Mandatory association with the GTIN and Batch/Lot Number |
||||
|
703n |
Approval number of processor |
01, 02, or 90# |
Mandatory association with a GTIN or with the identification of logistic unit contents |
||||
|
8001 |
Variables of roll products |
01 or 90# |
Mandatory association with a variable measure GTIN (e.g., an GTIN-14 starting with the digit 9) |
||||
|
8005 |
Price per unit of measure |
01 or 02 with N1 = 9 |
Mandatory association with a variable measure GTIN or the identification of variable measure content of a logistic unit |
||||
|
8007 |
International Bank Account Number |
8020 and 415 |
Mandatory association with the payment slip reference number and the GLN of the invoicing party |
||||
|
8008 |
Date and time of production |
01, 02, or 90# |
Mandatory association with a GTIN or with the identification of logistic unit contents |
||||
|
8020 |
Payment slip reference number |
415 |
Mandatory association with the GLN of the invoicing party |
||||
*
GS1 has established 01/01/2013 as the sunset date for AI 22
** Is (3nnn) where the first three digits are 312, 313, 324, 325, 326, 327, 328, and 329
*** Is (3nnn) where the first three digits are 310, 311, 314, 315, 316, 320, 321, 322, 323, 350, 351, 352, 356, 357, 360, 361, 364, 365, and 366
**** Is (3nnn) where the first three digits are 330, 331, 332, 333, 334, 335, 336, 340, 341, 342, 343, 344, 345, 346, 347, 348, 349, 353, 354, 355, 362, 363, 367, 368, and 369
# Deacom defines AI90 as item number and can be used as a substitute for AI01 or AI02 when one of those AI’s are required in the barcode. This should only be used when AI01 or AI02 are not available.
Invalid pairs of AIs
|
AI |
Name |
AI |
Name |
Comment |
|||
|
01 |
Global Trade Item Number |
01 |
Global Trade Item Number |
Duplicate Global Trade Item Numbers (GTINs) with different values |
|||
|
01 |
Global Trade Item Number |
02 |
GTIN of Trade Items Contained in a logistic unit |
AI (02) must not be used for the identification of trade items contained in a trade item. |
|||
|
01 |
Global Trade Item Number |
37 |
Count of trade items contained in a logistic unit |
The count of units contained would duplicate the master data of the GTIN. AI (37) may only be used with AI (02) |
|||
|
22 * |
Secondary data for specific health industry products |
30 |
Variable count |
Duplicate counts with different values |
|||
|
22 * |
Secondary data for specific health industry products |
10 |
Batch or Lot Number |
Duplicate lot numbers with different values |
|||
|
22 * |
Secondary data for specific health industry products |
17 |
Expiration date |
Duplicate expiration date with different values |
|||
|
22 * |
Secondary data for specific health industry products |
21 |
Serial number |
Duplicate serial numbers with different values |
|||
|
242 |
Made-to-Order Variation Number |
01 where n1 <> 9 |
Global Trade Item Number |
Made-to-Order Variation can only be used with a GTIN-14, Indicator digit 9. This represents a Custom Industrial Supply Item |
|||
|
242 |
Made-to-Order Variation Number |
02 where n1 <> 9 |
GTIN of Trade Items Contained in a logistic unit |
Made-to-Order Variation can only be used with a GTIN-14, Indicator digit 9. This represents a Custom Industrial Supply Item |
|||
|
420 |
Ship to - deliver to postal code within a single postal authority |
421 |
Ship to - deliver to postal code with Three-Digit ISO country code |
Only one ship to postal code may be applied on an item |
|||
|
422 |
Country of origin of a trade item Three-Digit ISO country code |
426 |
Country covering full process chain |
Duplication of country of origin of a trade item (covered by country of full processing) |
|||
|
423 |
Country of initial processing |
426 |
Country covering full process chain |
Duplication of country of initial processing (covered by country of full processing) |
|||
|
424 |
Country of processing |
426 |
Country covering full process chain |
Duplication of country of processing (covered by country of full processing) |
|||
|
425 |
Country of disassembly |
426 |
Country covering full process chain |
Duplication of country of disassembly (covered by country of full processing) |
|||
|
390d |
Amount payable – single monetary area |
391d |
Amount payable – with ISO currency code |
Only one amount payable Element String may be applied on a payment slip |
|||
|
392d |
Amount payable for a Variable Measure Trade Item – single monetary unit |
393d |
Amount payable for a Variable Measure Trade Item – with ISO currency code |
Only one amount payable Element String may be applied on a Variable Measure Trade Item |
|||
|
8006 |
Identification of the component of a trade item |
01 |
Global Trade Item Number |
Other GTINs cannot be used with AI (8006). The trade item is identified by a GTIN contained in the AI (8006) |
|||
*
GS1 has established 01/01/2013 as the sunset date for AI 22
Application Identifiers form
Opened via the "New" or "Modify" buttons on the Application Identifiers pre-filter.
|
Field/Flag |
Description |
|
Type |
Pick list used to select the kind of AI. Options are:
|
|
For |
Pick list used to select the part/category/sub-category classifications for the AI remappings and/or exclusions in WMS. Options are:
|
|
Form |
Pick list used to select the WMS form/transaction that the AI will be excluded from or remapped. Options are:
|
|
Unit |
Search box of all active records for Units. Only available when selecting a Type of "Unit".
|
|
Application Identifier |
Text field used to indicate the AI number that will be excluded or remapped. |
|
To Application Identifier |
Text field used to indicate the AI number that the number in the field above will be remapped to. Only available when selecting a Type of "Remap". |
|
Active |
If checked, this record is active. Only active records may be used in the system. |
Approved Devices
This security feature requires a device to be registered prior to an active Deacom user logging into the system. Users are required to enter a device description when initially logging into Deacom, which prompts the system to create an encrypted ID. A system administrator, with security access to "Approved Devices -- maintain", "System -- maintenance", and "System menu", can then modify the submitted device descriptions and mark pending requests as approved or denied.
System Navigation
System > Maintenance > Approved Devices
Approved Devices pre-filter
|
Field |
Description |
|---|---|
|
Report Type |
Pick list used to choose the desired kind of report that will generate. The only current option is "Standard". |
|
Deny |
Marks the device request as denied and populates the "Denied" date. The User will not be able to access the system. |
|
User |
The User who requested to be approved. |
|
Description |
The description entered by the User requesting to be approved. |
|
Requested |
The date the request was submitted. |
Device Approval report
Opened via the "View" button on the Device Approval pre-filter.
|
Field |
Description |
|---|---|
|
Last Name |
The last name of the User. |
|
First Name |
The first name of the User. |
|
Description |
The description entered by the User requesting to be approved. |
|
Requested |
The date the request was submitted. |
|
Approved |
The date the request was marked as approved. |
|
Denied |
The date the request was marked as denied. |
|
Last Login |
The date this User last logged in to the system. |
Edit Device Approval form
Opened via the "Modify" button on the Device Approval report.
|
Field/Button |
Description |
|---|---|
|
Approve |
Marks the device request as approved and populates the "Approved" date. The record must be saved, then the User will be able to access the system. |
|
Deny |
Marks the device request as denied and populates the "Denied" date. The User will not be able to access the system. |
|
User |
The User who requested to be approved. |
|
Description |
The description entered by the User requesting to be approved. |
|
Requested |
The date the request was submitted. |
|
Approved |
The date the request was marked as approved. |
|
Denied |
The date the request was marked as denied. |
|
Last Login |
The date this User last logged in to the system. |
Captions
Used in conjunction with Languages, Deacom allows users with the appropriate security settings to define custom Captions, both in the main application and in the WMS application. Languages must be defined first before custom captions can be assigned. When opened, the horizontal rows of the Captions form consist of the system captions and their language specific equivalents; the vertical columns consist of the languages and their custom caption, if one exists. A custom caption may be defined for each Language. If no custom caption is defined, the system will use the default caption. Note: In order to see custom captions in the system, uses must have the Language associated with the captions assigned in the "Language" field on their user profile via System > Maintenance > Users.
New default captions may be added, but not modified. The Deacom web console or service must be closed and restarted in order for caption modification to take effect.
System Navigation
System > Maintenance > Captions
Captions form
The Captions form lists all the system captions and their language equivalents, if one exists.
|
Field |
Description |
|---|---|
|
Default Caption |
Displays the system-generated caption. Cannot be modified. |
|
User |
Indicates if a caption is user-specific or for all users. |
|
Additional Languages |
Displays the caption for the language listed. One column will be displayed for each additional Language that is added to the system. |
Edit Default Caption form
Opened via the "Add" or "Modify" button on the Captions form, the Edit Default Caption form allows users to define a custom caption for the languages listed on the form.
|
Field |
Description |
|---|---|
|
Caption |
Display only. Indicates the system default caption. |
|
Additional Languages |
Displays the caption for the language listed. One column will be displayed for each additional Language that is added to the system. |
|
Active |
If checked, the Caption is active. Only active captions may be used in the system. |
Chart Group Security
Chart Group Security is used to control users' ability to view and select accounts in search boxes when working with transactions in Deacom. After creating User Groups and Chart of Account Groups, navigate to Chart Group Security to specify which User Groups have access to which Chart of Account Groups.
Access to modify Chart Group Security is governed by the security permission "System -- maintenance". This grid must be updated whenever a new Chart of Account Group or User Group is created to ensure the new group has appropriate access.
System Navigation
System > Maintenance > Chart Group Security
Chart Group Security form
The Chart Group Security grid displays one row for each Chart of Account Group and User Groups are displayed in the columns. In the fields where the Chart of Account Groups and User Groups intersect, security will display as Yes or No. Setting a field to "Yes" means Users in that User Group are able to view and assign accounts in that Chart of Account Group to transactions. Below is a sample Chart Group Security grid.
|
Name |
Accounting |
Purchasing |
Sales |
Supervisor |
Warehouse |
|---|---|---|---|---|---|
|
Assets |
Yes |
No |
No |
No |
No |
|
Liabilities |
Yes |
No |
No |
No |
No |
|
Revenues |
Yes |
No |
Yes |
Yes |
No |
|
Expenses |
Yes |
Yes |
No |
Yes |
No |
|
Inventory |
Yes |
No |
No |
Yes |
No |
Company Databases
DEACOM gives customers the ability to manage multiple companies with different vendors, customers, products, and production methods through the creation of multiple company databases. In some cases where companies share vendors, customers, and products but require separate reporting, setting up separate Facilities may be a better option. The steps required to create a new company, minimum setup requirements, and details on user security across multiple companies are detailed via the Building a Multi-Company DEACOM Environment Best Practice page.
System Navigation
- System > Maintenance > Company Databases
Edit Company Database form
Opened via the "New" or "Modify" buttons on the Company Databases form.
| Field/Flag | Description |
|---|---|
|
Name |
Displays the name of the company database, up to 30 alphanumeric characters. Spaces and special characters such as ?!@#$%^&*() may not be used. |
|
Description |
Displays the description of the database, up to 60 characters. Users will see this description in the database pick list when choosing which company to log into. The description will also appear in the form header in all system application forms. |
|
Document DB |
Displays the associated database that stores the document information, up to 30 characters. Spaces and special characters such as ?!@#$%^&*() may not be used. |
|
Active |
If checked, this database is active. Only active databases may be logged into and transacted in. |
|
Default |
If checked, this database will be the default selection on the login screen when accessing DEACOM.
|
|
Financial Master |
If checked, this company database will be used as the financial master when using the consolidated Financial Statement feature in DEACOM. |
Country Codes
The Country Codes maintenance table allows phone number masks for different countries to be specified. If there are no existing Country Codes, one is created automatically for North America. Once created, active Country Codes are available for selection in the "Country Code" search box via Bill-to Companies, Ship-to Companies, Brokers, Contacts, Contact People, Facilities, Sales Reps, Ship Via Methods, Ship-to Locations, Workers, Vendors, and System Options. Deacom will not allow duplicate country codes. Changing the Country Code re-formats all of the phone numbers if the new Country Code has a mask.
System Navigation
System > Maintenance > Country Codes
Edit Country Code form
Opened via the "New" or "Modify" buttons on the Country Codes form.
|
Field/Flag |
Description |
|---|---|
|
Country Code |
Displays the area code or prefix for the country code. |
|
Name |
Displays the name/description for the selected record. |
|
Phone Mask |
Displays the appropriate mask using the number 9 and dashes. Example "999-999-9999". |
|
Active |
If checked, the record is active. Only active records may be used in the system. |
|
Default |
If checked, this country code will be defaulted in the "Country Code" field throughout the system, even if a country code is identified on the General tab of System Options. |
Document Categories
Document Categories are used to define and group sets of documents that share common characteristics. The Document Category is also a searchable field on the Document Reporting pre-filter available via Tools > Document Reporting. The Document Category is a required field when attaching documents to master records in the system.
System Navigation
- System > Maintenance > Document Categories
Edit Document Category form
Opened via the "New" or "Modify" buttons on the Document Categories form.
|
Field/Flag |
Description |
|---|---|
|
Name |
Displays the name of the Document Category. |
|
Active |
If checked, the record is active. Only active records may be used in the system. |
|
Default |
If checked, this Document Category will be the default when attaching documents to master records in the system. |
|
E-Signature Required |
Only enabled if the “Record Document History” flag is checked in System > Options > Documents tab. If checked documents with this category assigned on the Edit Document Entry form will require an e-signature entry prior to making modifications.
|
Document Category Security
Document Category Security is where Deacom User Groups are assigned to Document Categories. This allows companies to restrict certain User Groups from accessing certain types of documents. For example, one customer was storing credit check documents on the Bill-to Company record. The business wanted only the Accounting and Administrative teams to have access to these documents but their Sales Reps also had access to the Bill-to Company record. Restricting Document Category Security access to the User Group that the Sales Reps are part of prevents them from being able to access the documents uploaded under the specified Document Category to the Bill-to Company.
System Navigation
System > Maintenance > Document Category Security
Document Group Security form
The Document Category Security grid displays all active User Groups horizontally and all active Document Categories vertically. By default, all entries in the grid are set to "No". Users can double click the word "No" to change the value to "Yes" for the desired group. This indicates that this User Group can view documents uploaded under the associated Document Categories
EDI Imports
The EDI (Electronic Data Interchange) process involves using computers to complete transactions electronically between two organizations, called “Trading Partners”. There are three major processes involved in the exchange of EDI data:
- Mapping – Involves transforming an EDI document into another format. Mapping is essential for proper system integration.
- Translation – The process of accepting inbound EDI data or preparing an outbound file for transmission.
- Communications – The transmission of the EDI transaction. This can be done indirectly through a VAN (Value Added Network) or directly via an FTP or FTPS connection.
Deacom provides a highly flexible and configurable EDI solution allowing companies to maximize the value of implementing EDI transactions. Any outbound transaction can be configured within Deacom. A list of Deacom-supported inbound and traditional outbound EDI transactions are shown below:
|
Transaction |
Common ID |
Inbound/Outbound |
|---|---|---|
|
Invoice |
810/880 |
Outbound |
|
Purchase Order |
850/875 |
Inbound |
|
Purchase Order Acknowledgement |
855 |
Outbound |
|
Advanced Shipment Notice |
856 |
Outbound |
|
Functional Acknowledgement |
997 |
Outbound |
An example of an EDI import would be an inbound purchase order, referred to as an 850. The data file from the trading partner would include the desired purchase quantity and the part number as well as additional information. This information would be mapped to the appropriate fields and tables in Deacom and imported into the system, resulting in the generation of a sales order to fulfill the trading partners order amount. When importing 850 SO EDIs, the import map will now execute product ID lookups in one of two ways:
- UPC Table (p4_codenum). The UPC lookup stores the UPC # in the "UPC Number" field on the SO line.
- Cust Xref (cu_codenum). The cu_prid lookup stores the Cust Xref # in the "Cust. Part Number" field on the SO line.
Best practice information for this function is available via Configuring Inbound EDI Transactions.
Note: The 875 and 880 transactions refer to grocery invoice and purchase orders.
System Navigation
- System > Maintenance > EDI Imports
EDI Import form
Opened via the “New” or “Modify” buttons on the EDI Imports form. Used to define the source for the EDI information that is to be imported as well as the criteria for creating new orders in the Deacom system.
|
Button/Field/Flag |
Description |
|---|---|
|
View Sample |
Opens file defined in sample file box for viewing. |
|
Import |
Imports any saved EDI Layout template. |
|
Export |
Saves EDI layout as a template. |
|
Name |
Name of the EDI Import, which must be unique. If a user enters a name that has already been used and clicks the "Import" button, the system will prompt the user that the name must be unique.
|
|
Source Path |
Location of the data files to be imported on the local server.
|
|
Success Path |
Location where data files that pass the EDI parameters will be sent on the local server and removed from the Source Path folder.
|
|
Failure Path |
Location where data files that fail the EDI parameters will be sent.
|
|
Transaction Type |
Determines if the EDI Import will be for Purchase Orders, Sales Orders, or Inventory (Adjustments).
|
|
Order Type |
Pick list used to define the Order Type to be created by the Import. The options available depend on the Transaction Type selected above. None
Purchase Order Type
Sales Order Type
|
|
Sample File |
Location of sample file, for reference. |
|
Notes |
Allow the user to store various notes that will remain post import/export. |
|
Frequency (Mins) |
Frequency to run import, if running automatically. The use of this field requires that the Deacom automation service or console is running.
|
|
FTP Server |
Address/location of FTP server. If set up, EDI import will retrieve information from Source Path on the FTP server. If a secure FTP connection is desired, set the prefix to be "FTPS://". |
|
SFTP Port |
Port number used for clients who use the Secure File Transfer Protocol. This field will only be used for SFTP and only when it is set to a port number. (greater than 0) |
|
FTP User Name |
Unique name of user for accessing FTP server. |
|
FTP Password |
Unique password of user for accessing FTP server. |
|
SSH Protocol |
|
|
Accept Invalid Certificate for FTPS |
If checked, indicates that system will accept invalid SSL certificates. This functionality is off by default (denying access to hosts with invalid SSL certificates). |
|
Use Binary FTP Mode |
If checked, Binary mode is used to transfer files. If unchecked, ASCII mode is used to transfer files. |
|
Allow Partially Processed Files |
|
|
Field Delimiter |
Pick list used to choose the delimiter that is used between fields. Options are:
|
|
Other Field Delimiter |
Specific field delimiter when the “Other” option is used. |
|
Line Delimiter |
Pick list used to choose the delimiter that is used between lines. Options are:
|
|
Other Line Delimiter |
Specific line delimiter when the “Other” option is used. |
|
New Order Condition |
Memo field to define when to create a new order. |
|
New Order When |
Pick list used in connection with the "New Order Condition" field. Options are:
|
|
New Line Condition |
Memo field to define a new sales order line. |
|
Skip Line Condition |
Memo field to define when to skip a line. |
|
Delete Line Condition |
Memo field to define when to delete a line.
|
|
New Order Same-As Current Order |
If checked, Sales/Purchase Order header information pulled via the EDI Import may be applied to multiple Sales/Purchase Orders. The process is:
|
|
Template |
Template data is used to copy and create actual EDI imports, and is not intended to be run. |
|
Active |
If checked, this record is active. Only active records can be used in the system. After saving an import with Active checked, the system will check all paths and triggers, warning the user if they are not valid. |
Edit Parsing Rule form
Opened via the "Add" or "Modify" buttons on the EDI Import form.
|
Field |
Description |
|---|---|
|
Field |
Pick list used to define the Deacom field name to which data is being imported. The fields available in the list depend on the Transaction Type selected on the EDI Import form.
|
|
Conditions |
Memo field to define when to import into the selected field. |
|
Type |
Pick list used to select the method to define data. Options are:
Notes:
|
|
Lookup Table |
Pick list used to select the Deacom table to look up data in, when using a "Type" of "Lookup". |
|
Lookup Expression |
Expression to define the table lookup. The expression will usually contain the name of the Deacom field stored in the table indicated in the "Lookup Table" field above.
|
|
Create Same-As |
Used in connection with the importing or creation of bill-to and ship-to customers through EDI. This field will only be available when selecting "Lookup Or Create" in the type field above. When this field is enabled, users may select a bill-to or ship-to customer (depending on which one was chosen in the field "Field" at the top of the form) that represents the record that will be copied and used to create the new customer record if the lookup fails. Additional information is available in the "Import & Creation Of Customers" section further down on this page. |
|
Field Expression |
Expression to define data for the field. |
Financial Statement Group Security
Financial Statement Group Security is where Deacom User Groups are assigned to Financial Statement Groups. Access to modify Financial Statement Group Security is governed by the security permission "System -- maintenance". This grid must be updated whenever a new Financial Statement Group or User Group is created to ensure users have the appropriate access.
System Navigation
System > Maintenance > Financial Statement Group Security
Financial Statement Group Security form
The Financial Statement Group Security grid displays one row for each Financial Statement Group and User Groups are displayed in the columns. In the fields where the Financial Statement Groups and User Groups intersect, security will display as Yes or No. Setting a field to "Yes" means Users in that User Group are able to run and view Financial Statements.
Form Layouts
Form Layouts allow system administrators to define different cosmetic designs for forms within Deacom. An example of a form is the Sales Order Entry form under the Sales menu. In the same sense that Grid Layouts allow end users to change the columns on a grid and Report Layouts allow users full control over the output of printed Reports and Part Forms, Form Layouts allow users to fine tune the work flows within each form in the system. Form Layouts can be modified and set for All Users, a User Group, or a Specific User. When a user-defined form layout is opened in the system, the word "User" will be displayed in parentheses next to the form name. See the Configuring Form Layouts page for details on creating and using Form Layouts in Deacom. The "Toolbar -- Edit Form Layouts" security setting controls access to this feature. The use of the Layout functionality when editing user-define fields allows the user to break user fields onto different tabs by groups, and greatly increase the operators efficiency during entry.
Notes:
System Navigation
- System > Maintenance > Form Layouts
- The "Layout" button via any form throughout the system.
Forms
Every Window in Deacom has an associated form layout. When you navigate to System > Maintenance > Form Layouts, you will see a list of user-defined form layouts in this instance of Deacom. IF there is nothing here, then all the forms used are the system forms. The easiest way to figure out what form you want to edit is to click on the "Layout" button on the form you are on. This will bring you immediately to the Form Layout Editor for this form. If you want to add another copy of a given form layout you will want to click 'New' to add a new form layout to the list.
Please be aware that several forms in Deacom are "utility" form layouts and appear throughout the system. MainMain is a perfect example of one of these utility form layouts. If you modify this layout for a specific purpose, the modifications will appear everywhere this form is used. MainMain is used on most of the Maintenance menu options. To make additions to a utility form layout that are specific to a specific instance of the utility layout will require scripting.
|
Button |
Description |
|---|---|
|
New |
Allows you to add a new Form layout to your list of user-defined forms. When clicked, a search box opens to allow you to select the base form layout to use. |
|
Modify |
Allows you to modify the selected form layout by opening the Form Layout Editor. |
|
Display |
Allows you to choose Active, All, or Inactive form layouts to show in the grid. |
|
Layout |
Allows you to Modify this form layout (MainMain). |
|
Activate All |
When viewing your inactive forms, this will bulk activate the inactive forms visible in this list. |
|
Deactivate All |
When viewing active forms, this will bulk deactivate the forms visible in the list. Note: Occasionally a form layout can become corrupted and the only way to inactivate it is to filter the Form Layout grid down to just that form layout and click Deactivate All. |
|
Export All |
When clicked, creates a file for each user form layout in the list. The file(s) will be downloaded to the Windows download folder.
|
Form Layout Editor form
Once launched, the user is presented with a WYSIWYG (What You See Is What You Get) interface conducive to interactive design on the left side of the window. The right side of the window presents header-level options for managing the Form Layout as well as a tree view which can also be used to interact with the objects on the layout. Complete information on setting up and using Form Layouts is available via the Configuring Form Layouts page.
|
Button |
Description |
|---|---|
|
Import |
Allows you to import a Deacom .uform file for this layout from other Deacom systems. |
|
Export |
Ability to export a Form Layout to a .uform file. |
|
Add New |
Depending on which Object selected in the tree allows you to add elements to the object. This is hierarchical and dependent on the object chosen. |
|
Modify |
Allows you to modify the element selected in the tree or in the WYSIWYG editor on the left. |
|
Delete |
Allows you to delete the selected element. Using this button is the only way to delete an element from your form. |
|
Save |
Allows you to save the form layout design you created. Notes:
|
|
Undo |
Undoes any changes made to the form layout. |
|
Field/Flag |
Description |
|---|---|
|
Layout For |
All users, User Group, or Specific User. This option defines what users this form layout will apply to. |
|
User Group |
Contextual search field. Only enabled for Layout For types of “User Group” and “Specific User”. |
|
Device |
Allows you to choose what this form layout is for. All, Desktop, or Mobile. Defaults to All. |
|
Description |
A short description of the purpose of the layout. For instance, “Customer Service – Fast Order Entry”. Note: You should always update your Description each time you alter the form layout. We recommend adding the date modified to your description text. |
|
Active |
Defaults to true, uncheck to make the layout no longer apply. Unchecking this flag and saving will reset the form to the default system version in Deacom. Note: Deacom uses the oldest active form layout when loading the form for the user. If you have two form layouts for the same form and layout for, then the layout with the smallest ID (oldest) will draw on the screen. To use a newer form layout, always inactivate the older form layout to see the new form. |
Object Types
The list below contains the form objects used in Deacom. These objects are intractable in the Form Layout Editor. Object types are pre-determined by Deacom for the specific field you are using. There are options to create unbound custom controls for several of these object types on any grid you would like. They are "unbound" meaning they do not link to a database field and will not be saved/updated by base Deacom. They will require scripting if you want to save the data in these unbound custom controls.
|
Object |
Purpose |
|---|---|
|
Form |
The form itself is the container for all other objects on the form. |
|
Section * |
Sections contain other objects and can either be two columns wide or one column wide. |
|
SectionFrame * |
Section Frames contain Sections, every Section in a Frame becomes a Tab. |
|
ToolBar |
ToolBars contain buttons and are always either at the top of a form or the top of a grid. |
|
ToolBarButton * |
Buttons on the toolbar, such as the "Add" button. |
|
ToolBarSeparator * |
Vertical line separators that allow for separation between groups of buttons. |
|
CheckBox |
Boolean state boxes that are either checked or unchecked, such as "Active". There is also an option for Custom Criteria, which can search for User Defined Fields. |
|
ColorPicker |
A control that allows for selecting a color, such as the Work Flow Color. |
|
ComboBox * |
Also referred to as a "Dropdown" or a "Picklist", allows for selection from a pre-defined group of options. There is also an option for Custom Criteria, which can search for User Defined Fields. |
|
DateBox |
Allows for the selection of a date. There is also an option for Custom Criteria, which can search for User Defined Fields. |
|
FilePicker |
Allows for the selection of a file, such as in View Docs. |
|
FontPicker |
Allows for the selection of font, such as the Grid Font in System Options. |
|
Grid |
Displays data in a row / column format. |
|
MemoBox |
Allows for the entry of data that is multi-line and free-form. |
|
MultiLineTextBox |
Allows for the entry of data that is multi-line and free-form, except without drilling down (such as the send email form). |
|
SignatureBox |
Allows for the recording of a signature, such as in the Point of Sale application. |
|
SearchBox |
Allows for lookups of records for assignment purposes, prevalent on editing forms and pre-filters. There is also an option for Custom Criteria, which can search for User Defined Fields. |
|
TextBox * |
Allows for single line of text entry. |
|
PhoneTextBox |
A variant of the TextBox that allows for quick phone calls in the mobile application. |
|
URLTextBox |
A variant of the TextBox that allows for launching of a URL on click. |
|
TimeBox |
Allows for the recording of time to accompany a date. |
|
Tree |
Shows parent / child relational data, such as on the configurator or the form layout designer itself. |
* Available as a custom control.
^ Available as a custom control starting in 17.04.
Edit Element Form
Properties Tab
-
All elements(objects) have a "Control", "Type", and "Caption" property. The additional properties displayed on the "Edit Element" form vary depending on the element selected. Reference the "Configuring Form Layouts" page for additional information on using the "Edit Element" form.
-
The options in the "Control" also vary depending on where the Edit Element form is being added or modified. For example, when adding a new element for a SectionFrame, the Control field will have the options of Section and TileSection. When adding a new element for a specific grid the Control field will offer multiple options such as CustomDataBox, CustomListBox etc.
|
Field/Flag |
Description |
|---|---|
| Control |
Displays the name of the Object selected from the drop down list. Options are:
|
| Type | Select the Object Type desired for this Object. |
| Caption | Enter a Caption for the Object which will be displayed when the Object is viewed on the form throughout the system. |
| Save Button |
Controls what happens for this element when the "Save" button is executed/clicked. Options are:
|
| Format | Option to enter pre-defined FoxPro format options such as left, center, or right justify. Rarely used; generally left blank. |
| Input Mask |
Controls how number values will be displayed and is used for formatting purposes only. (i.e. 999-999-9999 for phone number.) Use "9" for digit placeholders.
|
| Unique |
Determines if the user would like prompts if the input in this field matches other records in the database. The options function as follow:
|
| Default Value | Sets the default filter value for this field on a pre-filter form. This field is not implemented to work on setting a default value on an edit form. If you want a default value to be pre-set on a form layout for a new record, this will require a script on Record Load of the form layout. |
| Scale Source | Allows the user to link a custom control textbox to a specific scale(s) by referencing another field/element on the form such as a custom control searchbox or textbox containing a scale ID. This allows multiple scales to be used on the same Form Layout, granting the ability to switch scales dynamically instead of only what is in Production settings. Only enabled when Control is "CustomTextBox" and "Scale Input" is true. |
|
Enable Folder Picker |
If checked, the systemwill support both folder selection and multi-file selection in fields with a Type of "FilePicker"
|
| Enabled | If checked, the selected element will be active and interactable for users. |
| Encrypted Text |
If checked, the selected element will have automatically encrypted contents, when entered, rather than relying on doing it manually. These fields will show as ****** in forms and tooltips.
|
| Fire Change Event on Programmatic Change |
This applies to scripting only. Users are strongly encouraged to use the scripting method Event.Invoke() instead of this property. If checked, other changes in the system that effect this element will cause changes to this element. If unchecked, this element will remain the same regardless of other changes in the environment. |
| Password | If checked, the field will be encrypted as the user types into it. |
| Required | If checked, the selected element must be filled out before a user can save the respective form. |
| Scale Input | Only available for numeric fields. If checked, this field will populate whenever the bound scale reads a weight for a part. Minimizes user entry error potential. |
| Visible | If checked, the selected element is viewable by all users. |
Events Tab
This tab is used to connect to events for this particular element. Users can add, modify and delete events to fire scripts from this form. Available events for each element can be different depending on the field type you are editing. A full list of events can be found in the Scripting Library.
|
Button |
Description |
|---|---|
|
Add |
Allows you to add a new event to this element property. Available events depend on the property selected in the Edit Element. |
|
Modify |
Allows you to modify the selected Event grid entry. This along with double-clicking the entry in the grid is how you will edit the script you created. |
|
Delete |
Deletes the event and associated script. |
Clicking Add or Modify opens the Edit Event modal window. Here you will choose the event you want to use to fire your script. Write your script in the Script field. The script field opens a scripting memo box with the methods, functions, and properties available to this event in a tree on the right side of the field. Double-clicking any of the entries will add the entry to your script in the proper syntax. More on scripting can be found in the Scripting Library along with a growing dictionary of methods, functions, and properties. Note: Be sure to always click the Save button prior to leaving the Edit Event form. This form is missing the warning about saving the data before exiting and will delete all your unsaved changes.
Blank Form Layout
This layout is an empty form that you can set up for your needs. You will only be allowed to add custom control elements to this form layout. You cannot add Deacom system elements, grids, or buttons to this form. The only way you can open this form is through scripting using Event.Form.OpenForm(). Any data entered on blank forms will need to be gathered and saved using scripting methods.
Available Custom Controls
Before 17.04
- SectionFrame
- Section
- Toolbar Separator
- TextBox
- ComboBox
- CustomToolBarButton
Available in 17.04
- CustomTileBox
- Toolbar
- CheckBox
- DateBox
- MemoBox
- SearchBox
- TimeBox
- PhoneTextBox
- URLTextBox
- MultiLineTextBox
- ListBox
- ColorPicker
- FilePicker
- FontPicker
When creating these custom controls, you will be required to create a unique Identifier for each custom control on the form layout. Any custom Controls
Note: Unbound Grids are not available to any form, copying an existing grid with the intention of changing the data in it, will alter both instances of the grid to be identical.
Form Images
Tile boxes have the capability to display images and PDFs,
- Supported formats include common image types (e.g., PNG, JPG) and PDFs.
- Optionally, use a custom script to dynamically replace or update the image content within the tile box.
Users can re size and drag the image as necessary. For example:
- When the image appears in the tile:
- Hover to have the zoom-in magnifying glass cursor appear.
- Click to open the image viewer — this opens a full-form viewer showing the image at a fit size.
- Within the viewer:
- Click once to view at full resolution.
- Click again to return to fit size.
- Click and drag to move the image when zoomed.
- Use the close (X) button in the top right or click the backdrop to close the viewer.
- If the tile displays a PDF, browser controls allow zooming, scrolling, and viewing within the tile.
- A script can replace the PDF with an image if desired.
Form Image Example
In this example, a custom tilebox is added to the user version of the Job Entry form layout.
Once in the Form Layout view, we will create a customtilebox captioned "URL" that will be added next to the Lines section on the Job Entry form.
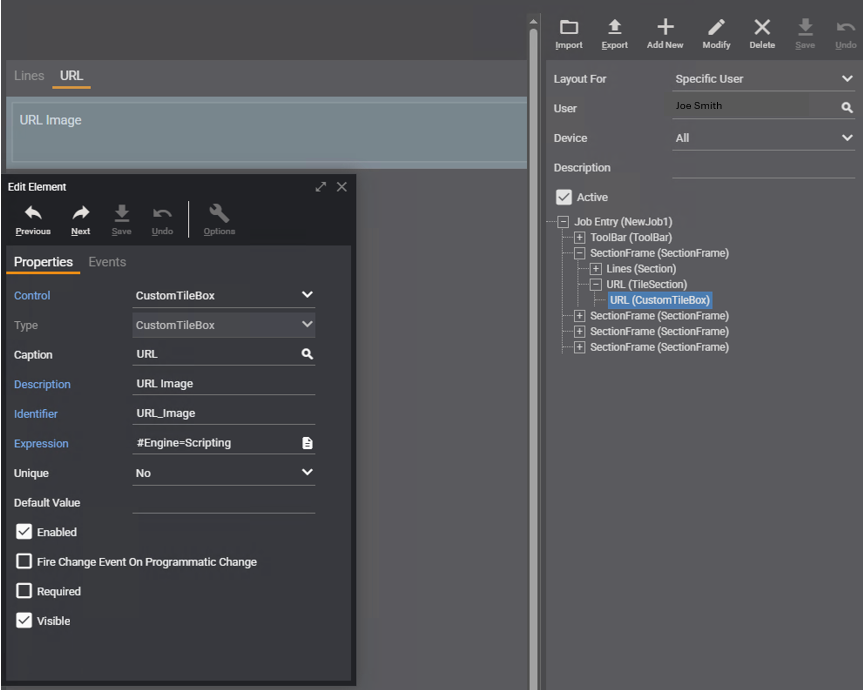
Edit Element details
|
Property |
Entry/Selection |
|---|---|
|
Control |
CustomTileBox |
|
Type |
CustomTileBox |
|
Caption |
URL |
|
Description |
URLImage |
|
Identifier |
URL_Image |
|
Expression |
#Engine=Scripting function lfUrl() { var loPayload = { "Filename": "https://canto-wp-media.s3.amazonaws.com/app/uploads/2019/08/19194138/image-url-3.jpg", "Content": "" }; return Convert.ToJSON(loPayload); } lfUrl(); |
|
Unique |
No |
|
Default Value |
leave blank |
|
Enabled |
checked |
|
Fire Change Event On Programmatic Change |
unchecked |
|
Required |
unchecked |
|
Visible |
checked |
Related Pages
- Configuring Form Layouts
- Scripting Library
Grid Layout Security
Grid Layout Security gives companies the option to control which User Groups can view user and system versions of Grid Layouts/reports in the system. Access to modify Grid Layout Security is governed by the security permission "System -- grid layout security".
System versions of Grid Layouts are included automatically in the Grid Layout Security grid. When a new user version of a Grid Layout is created, the "Require Grid Security" flag on the Grid Layout form determines if that Grid Layout will be added to the Grid Layout Security grid. This grid must be updated whenever a new Grid Layout requiring grid security is created or when a new User Group is created to ensure users have the appropriate access. Note that individual user access to Grid Layouts is controlled by the "Edit Grid Access" button on the individual User record via System > Maintenance > Users. Users inherit the permissions of the User Group to which they are assigned. Exceptions to the group can be managed at the User level.
System Navigation
System > Maintenance > Grid Layout Security
Grid Layout Security form
The Grid Layout Security grid displays one row for each user and system version of a Grid Layout, and one column for each User Group. In the field where the Grid Layout and User Group intersect, security will display as Yes or No. If a field is set to "Yes" this means Users in that User Group are able to run and view the Grid Layout in the system.
Notes:
- Setting the security on this form also sets the same security on the Edit Group Grid Access form (accessed via the "Edit Grid Access" button) in System > Maintenance > User Groups.
- The title of the Grid Layout, which represents the name that appears to the user in the system, can be added to the Grid Layout Security form by adding the c2_caption field to the Grid Layout Security Grid Layout.
- If a user does not have access to a Grid Layout associated with a report, they will not be able to see that report in the "Report Type" field on the appropriate pre-filter in the system.
Grid Layouts
In Deacom, the reports or lists that are generated via pre-filters are referred to as grids. Grid Layouts refer to the interface that controls the characteristics of the fields contained in the grid as well as which fields will be displayed and in what order. Deacom system Grid Layouts cannot be modified. Instead, users can create and/or modify user versions of the system Grid Layouts. When a user version of a system grid is created, the word "User" will be displayed in parentheses on the Grid Layout button located on the "Deacom Toolbar" for that grid.
User versions of Grid Layouts should be created or modified via the "Grid Layout" button (or "Grid Layout (User) button as indicated above) on the grid toolbar as detailed in Deacom Basics > Deacom 101 > Basic Objects and User Interface. The list of Grid Layouts on this form should only be accessed and/or modified by system administrators or power users for the following reasons:
- To remove a field/column from a grid that is causing an error, such as when trying to launch a report.
- When implementing Deacom for the first time and creating a user version of a Grid layout, for example when using Deacom Mobile applications.
- When adding new user reports to selected reporting areas in the system.
The checkprintap and checkprintar Grid Layouts are used to control the information/fields that print on the "Check" system report. The "Check" system report represents the actual check document that is printed from the Deacom system.
System Navigation
System > Maintenance > Grid Layouts
Grid Layouts form
|
Button/Field |
Description |
|---|---|
|
New |
If clicked, opens the Edit Grid Layout form to create a new user version of the selected grid.
|
|
Modify |
If clicked, opens the Edit Grid Layout form to modify the selected user grid. System grids may not be modified. |
|
Delete |
If clicked, deletes the selected user grid. |
|
Copy Grid Layout |
If clicked, opens the Edit Grid Layout form to create a new user version of the selected grid.
|
|
Name |
Displays the name of the grid. |
|
Title |
Displays the title with which the grid/form loads, which may be modified when adding or modifying user versions of system grids. |
|
Grid For |
Displays the User or User Group for which the grid was configured, or displays as "System" if it is a system grid. |
|
Mobile |
Displays the status of if the grid is used in Mobile applications, as configured using the "Mobile" flag on the Edit Grid Layout form. |
Edit Grid Layout form
Edit Grid Layout
|
Button/Field/Flag |
Description |
|---|---|
|
Add |
If clicked, opens the Edit Grid Column form to add a new field to the grid. |
|
Modify |
If clicked, opens the Edit Grid Column form to modify the selected field. |
|
Delete |
If clicked, deletes the selected field from the grid. |
|
Sort |
If clicked, allows the user to sort the order in which the fields listed will appear. |
|
Name |
Displays the name of the grid. |
|
Grid Code |
Displays the name of the grid as referred to in the code. |
|
Title |
Displays the title with which the grid/form loads. |
|
Grid For |
Pick list used to determine if this grid will be used for all users, a specific User, or a specific User Group. Note that an All Users version of a system Grid Layout must exist before creating a Grid Layout for specific Users or User Groups.
|
|
User/User Group |
Search field used to select a specific User or User Group to assign this grid.
|
|
Advanced Filter |
Searchbox that allows a user to apply a previously made active filter into the selected grid, implementing fields such as Logic, Operator, Value, and Type. Advanced Filters can not be applied to BI Pages or Favorites.
|
|
User Auto-Refresh |
Pick list used to dictate how the user grid will refresh. Options are:
|
|
User Parent Refresh |
Pick list used to dictate how the user grid will refresh when its' parent form is refreshed or modified. Options are:
|
|
Device |
Pick list used to indicate the application where the grid will be applied. Options are:
Notes: 1. Users can create separate grids, one for Mobile and one for Desktop from the same system grid. 2. If changing this setting to All and grids exist for either Mobile or Desktop, the system will delete those grids. |
|
Pinned Columns |
Defines the number of columns, beginning on the left, that will be pinned or frozen on the grid. Example: If your report has 30 columns, entering a value of 2 will result in the two leftmost columns being frozen as the user scrolls from left to right.
|
|
Mobile |
If checked, indicates that the mobile specific grid for this system grid will be made available to mobile application. The mobile specific grid is a simplified version of the default system grid containing the core information for the report. |
|
System Auto-Refresh |
If checked, the system will automatically refresh the contents of the grid. |
|
System Parent Refresh |
If checked, the system will automatically refresh the contents of the grid once its' parent form is refreshed or modified. |
|
Require Grid Security |
If checked, this Grid Layout will be added to the Grid Layout Security form.
|
Export Format
The Export Format section offers the ability to export to text files from the grid and is useful in situations where customers need to send report information to banks, for example, which generally only accept text files.
The Export Format form is opened via the "Add" or "Modify" button in the Export Format section.
|
Field/Flag |
Description |
|---|---|
|
Name |
Enter the name of the Export Format. |
|
Type |
Select "Print Out" or "Text." |
|
Report |
Select an available report.
|
|
Text |
|
|
Default |
If checked, indicates this is the default Export Format for the selected grid. |
Edit Grid Column form
Opened via the "Add" or "Modify" buttons on the Edit Grid Layout form.
|
Field/Flag |
Description |
|---|---|
|
Field Name |
Displays the name of the field. |
|
User Expression |
Memo field used to store an expression. |
|
Title |
Search field used to select the Caption for the Field selected. |
|
Width |
Displays how wide the column will appear on the grid. |
|
Format |
Option to enter pre-defined FoxPro format options such as left, center, or right justify.
|
|
Input Mask |
Controls how number values will be displayed and is used for formatting purposes only. (i.e. 999-999-9999 for phone number.)
|
|
Mobile Font Style |
Pick list used to determine if the Title should appear in Bold, Italic, or Standard font. |
|
Sort Descending |
If checked, the first double-click on a column header sorts in descending order. |
|
Sum |
If checked, indicates column will be summed and results will be displayed underneath the toolbar on the report the next time it is displayed.
|
|
Include In Preview |
If checked, indicates this field will be displayed in the print preview.
|
|
Time Field |
If checked, requires field to be entered in the following time format: MM:HH PM/AM. |
|
Show Mobile Caption |
If checked, this field will display in Mobile versions of this form. |
Languages
Languages are only available in the Web version of Deacom and when using WMS.
Used in conjunction with Captions, Languages offer the option to display fields and forms in different languages for specific Users. In addition to traditional natural languages such as English, Spanish, Chinese or French, languages may be used to encompass different industry-specific terms. For example, a company involved in servicing HVAC units, may refer to a Sales Order as a service order and configure many of the fields on the Sales Order Entry form to support the concept of servicing a heating or air conditioning unit as opposed to selling products.
Once languages are created, they are assigned to individual users via > System > Maintenance > Users. Users will need to log out and back into the application to have the language assignment take effect.
The Customer and Vendor master records contain a "Language" field, which allows specific languages to be set for these records. When documents are printed for orders/transactions whose Customers/Vendors contains these languages, this language will be used in place of others set up in the system and for the appropriate users. This is useful in situations where captions on documents for Vendors or Customers will be different than the language assigned to specific users.
System Navigation
System > Maintenance > Languages
Edit Language form
Opened via the "New" or "Modify" buttons on the Languages form.
|
Field/Flag |
Description |
|---|---|
|
Language |
Defines the name of the language. |
|
Culture |
Defines the culture used with the specified language. The culture selected will enable the system to use the date/time/number formatting generally defined for that culture when printing a sales report or part form. When printing, the date/time/number formatting will follow that of the Culture set for the Language on the Bill-To or Ship-To, depending on which is assigned to the Language field for the report/part form.
|
|
Label Width |
Defines the length of the field labels for this language. |
|
Field Width |
Defines the length of the actual fields when using this language. |
|
Active |
If checked, this record is active. Only active records may be used in the system. |
|
Default |
If checked, this Language is considered the default. There may only be one default language in the system. |
Prompts
The Prompts form allow companies to create language-specific versions of existing system prompts. For example, in English, the system will display a prompt when material is finished on a Job. The Prompt name is "Job Finish Complete" and reads as "Job finish is complete". Users have the option to create a language-specific version of this prompt.
The process begins with defining additional Languages. Once defined, users can navigate to the Prompts form, which will present a list of all system prompts. Users may select a prompt from the list and click the "Modify" button to display the Edit Prompt form. The form will display the system prompt and text boxes for all active Languages in the system.
For Users that have a Language other than English defined on their profile, the system will use that Language's Captions and Prompts when that user is logged in and transacting in DEACOM.
Users cannot modify or delete system captions. Prompts are only available in web versions of DEACOM.
System Navigation
- System > Maintenance > Prompts
Edit Prompt form
| Field | Description |
|---|---|
|
[Prompt Name] |
Memo field that stores the system version of the Prompt. |
|
[Language Name] |
Memo field used to configure the Language-specific version of the Prompt. |
Quality Control Group Security
Quality Control is a major method of providing process control within Deacom. Quality Control ensures that required Quality Control Tests are performed when Raw Materials are received on Purchase Orders, when Finished Goods are produced on production Jobs, and when previously sold products are returned. Quality Control is an optional feature with a wide array of applications ranging from completely turned off to extremely strict requirements, and is established on an item by item basis. This means that some items can have absolutely no quality control, while others can have many required QC tests.
Quality Control Tests are required to do QC testing. The Quality Control Test describes the base name of the test as well as any applicable testing methods and the Unit of Measure that should be used for testing. Quality Control Groups are a list of sequenced Quality Control Tests for the group to perform. QC Groups can be attached to a Part's Item Master to indicate testing required upon PO receipt or on a Bill of Materials to indicate testing required prior to, or following, finishing of material on a production Job. If two items have identical QC Tests and allowable results, they can share the same QC Group. If two items have different QC Tests or different allowable results, they would each have a different QC Group. A system can have as few as one QC Group, or as many QC Groups as there are items, or anything in between. Items may also have multiple QC Groups assigned based on different testing levels. For example, all Raw Materials may be assigned a basic QC Group, with a certain sub set of Raw Materials being assigned an additional QC Group on the Item Master record to ensure these materials undergo additional QC testing requirements.
Quality Control Security Groups are assigned to each Quality Control Test when the test is added to a Quality Control Group. User Groups are then assigned to QC Security Groups using Quality Control Group Security. This grid must be updated whenever a new Quality Control Security Group or User Group is created to ensure the new group has appropriate access. Specific test protocols and security for entering QC data are configured via Quality Control Groups and security for who can enter QC values is configured via Quality Control Security Groups. Additional system security is required to perform functions such as creating or modifying QC Tests and QC Security Groups.
System Navigation
- System > Maintenance > Quality Control Group Security
Quality Control Group Security form
The Quality Control Group Security grid displays one row for each Quality Control Security Group and User Groups are displayed in the columns. In the fields where the Quality Control Security Groups and User Groups intersect, security will display as Yes or No. Setting a field to "Yes" means Users in that User Group are able to access and enter QC results for Quality Control Tests that are assigned that Quality Control Security Group.
Registers
For companies that leverage the POS functionality, registers may be added and managed to keep multiple cash drawers separate. While previous Deacom reconciliation was tied to Payment Type and Facility, this new option is especially helpful for drawers that are reconciled individually and at separate times throughout the day. Registers can be reconciled and any variances balanced so that the next user starts with a known balance. Registers are both tied to specific Facilities and adhere to User Restrictions. This means that if a cashier switches from operating a Register within their restricted facility to operating a Register tied to a Facility that they are not allowed to transact in, the system will prevent the user from logging onto the POS with that Register. Users have the option to assign multiple printers/scales to a register.
System Navigation
- System > Maintenance > Registers
Edit Register form
Opened via the "New" or "Modify" button on the Registers form.
General tab
|
Field/Flag |
Description |
|---|---|
|
Name |
Indicates the name of the Register. |
|
Facility |
Indicates the Facility in which this Register is used. |
|
EMV Processor |
Pick list used to select the EMV processor created via Accounting > Maintenance > Credit Card Processors.
|
|
Terminal ID |
Defines the Terminal ID used for the EMV register/device.
|
|
Printer |
Pick list used to select the Printer to which this Register should print documents, including those installed via Deacom Local and Deacom Cloud Local. |
|
Active |
If checked, this record is active. Only active records may be used in the system. |
|
Default |
If checked, this Register is the default selected when a user logs onto the POS. If no default is selected, the first record in the list will be used. |
Printers tab
Pick list used to select the Printer to which this Register should print documents, including those installed via DEACOM Local and DEACOM Cloud Local.
Scale tab
Scale Models are used to define the interface used to communicate to a particular type of scale. The scales tab allows companies to specify a default scale linked to the selected register.
Revision Facility Security
Revision Facility Security is used to control which User Groups have access to view or modify specific Facility BOM revisions. This feature was added to allow certain users to add or modify Items and Formulas specific to their User Restriction (Formulator, Item Planner, Facility) while also allowing them to view only Items and Formulas anywhere else.
System Navigation
System > Maintenance > Revision Facility Security
Revision Facility Security form
The Revision Facility Security grid displays all active User Groups horizontally and all active Facilities vertically. In addition, there will be a "None" option included in the Facilities list to allow security to be set for BOMs that do not have a Facility defined. By default, all entries in the grid are set to "No". Users can double click the word "No" to change the value to "Yes" for the desired group. This indicates that this User Group can view and modify BOM revisions linked to the associated Facility.
Searchboxes
Throughout Deacom there are various searchbox fields which allow users to select from a pre-defined list of objects. Searchboxes are identified by the "S," or magnifying glass button/sy,bol displayed next to the field. Once clicked, a form is displayed with the list of available selections for that searchbox, based on active records and user restrictions.
Note: The Searchboxes in the list may vary depending on the licensed features which are enabled in the system.
Deacom utilizes over 200 default searchboxes available to users throughout the system. As with many areas of Deacom, searchbox grid layouts can be modified to suit users' needs. This is done by selecting the "Modify Layout" button and adding any fields necessary.
Additional notes regarding searchboxes include the following:
- While searchboxes may be modified in any way the user sees fit, the default system searchboxes may neither be modified nor deleted. Instead, any modifications done to the searchbox are added as a user version. If there is a user version available for a particular searchbox, this automatically overrides the default system searchbox.
- Since system searchboxes may not be deleted, users are restricted from completing this action by a system prompt which states "You cannot delete a system searchbox." However, user versions of searchboxes may be deleted at will and can be recreated when necessary.
- A Part's "Lead Time" (pr_orddays) and "Make to Order" (pr_makeord) fields, as defined on the Item Master MRP and Properties tabs, respectively, are available to all Part Number searchboxes. This information is useful for customer service teams and aids in quickly determining when they can promise shipment to a customer during Sales Order entry.
System Navigation
System > Maintenance > Searchboxes
Edit Searchbox form
Opened via the "New" or "Modify" button on the Edit Searchbox form. Note, when clicking the "Layout" button in a search box field, the Edit Searchbox form will also be displayed.
|
Button/Field |
Description |
|---|---|
|
Layout |
If clicked, opens the Form Layout for the current grid. |
|
Name |
Displays the name of the field that prompts the selected searchbox. Use the drop down arrow to see the list of available fields. |
|
Caption |
Memo field used to store the user-configured name of the searchbox. |
|
Data Type |
Indicates the type of data displayed in the field, either Character, Date, or Numeric. |
|
Width |
Indicates the width of the column in the form. |
|
Format |
Option to enter pre-defined FoxPro format options such as left, center, or right justify. Rarely used; generally left blank. This field can be used create a variety of formats for output generated from Field controls by creating a format string expression. See the Basic Objects and User Interface help page for additional information. |
|
Input Mask |
Displays the mask used to input the character, date, or number for the field. |
|
Mobile Field Type |
Option to select if the selected field will be a primary or secondary field when using the Deacom Mobile application. Primary fields will be displayed in a larger font and generally on top of secondary fields. |
|
Sort Descending |
If checked, the first double-click on a column header sorts in descending order. |
Security Questions
Security Questions are one of three different authentication methods available in Deacom. If the “Security Question Authentication” flag is checked on the user, then they will be required to select from the list of questions on this page in order to access the system. The number of questions that must be answered is determined by the “Security Questions” setting in System > Options > Authentication tab.
System Navigation
System > Maintenance > Security Questions
Edit Security Question form
Opened via the "New" or "Modify" buttons on the Security Questions form.
|
Button/Field |
Description |
|---|---|
|
Question |
Text box used to enter the user security question |
|
Active |
Check to make the question active |
Triggers
A Trigger is a stored procedure that runs automatically when a row is inserted, updated, or deleted in a table. In Deacom, triggers serve two purposes:
- Notifying Users or User Groups, via email, when changes to a system table are made. Examples include the creation of a new Vendor record or updates made to a product formula
- Creation of EDI output files used for EDI exports such as 810 Invoices.
Triggers are very useful for notifying users when changes or updates to important tables have been made in the system.
Once the Edit Trigger form has been completed and saved, the Trigger setup process is complete. The Trigger will run automatically and produce the appropriate output, either EDI files or emails, whenever transactions are run that insert, update, or delete rows in the table indicated on the Edit Trigger form.
Notes:
- Anytime changes are made to the trigger via the Edit Trigger form, the automation console or service should be stopped and then restarted.
- Changes to the fields in System Options are immediately available to Triggers without requiring a restart of the automation console or service.
System Navigation
System > Maintenance > Triggers
Edit Trigger form
General tab
|
Button/Field/Flag |
Description |
|---|---|
|
Copy Trigger |
Allows the user to copy another Trigger to use as a base to create a new Trigger. |
|
Show Fields |
Displays lists of fields and variables that can be used in the Trigger. |
|
Name |
Defines the name of the Trigger, which must be unique. |
|
Trigger Event |
Pick list used to define when the Trigger will fire. Options are:
|
|
Table |
Pick list used to indicate the Deacom table that will be used as the source of the Trigger. |
|
Output |
Pick list used to select the result of the Trigger firing. Options are:
|
|
Subject |
Information or text that will populate the subject line of the email.
|
|
Destination |
Address for email or folder for EDI file or, when the "Output" field is set to "HTTP POST," the URL where the trigger will post.
|
|
CC Email |
Address for an email to be sent a carbon copy, which will be present on the recipient's header. Only available when Output is set to "HTML Email" or "Plain Text Email". |
|
BCC Email |
Address for an email to be sent a blind carbon copy, which will not be present on the recipient's header. Only available when Output is set to "HTML Email" or "Plain Text Email". |
|
Conditions |
Defines the conditions that must be met to fire the Trigger.
|
|
Message |
Message body for email or contents of EDI file.
|
|
Delivery Expression |
Used to enable a delayed action in a Trigger. In other words, it is used to hold the expression to calculate the date and time when a Trigger should fire.
|
|
Delivery Condition |
Designed to handle situations where reminders to a Vendor need to be sent at various times and on various dates.
|
|
Custom Query |
Memo field used to define a custom query that allows greater functionality.
|
|
Notes |
User can add various notes to the Trigger such as identifying the author or for code explanations. |
|
FTP Server |
Only available when selecting an "Output" of "EDI." Defines the address/location of FTP server. |
|
SFTP Port |
Port number used for clients who use the Secure File Transfer Protocol. This field will only be used for SFTP and only when it is set to a port number. (greater than 0)
|
|
FTP User Name |
Only available when selecting an "Output" of "EDI." Defines the unique name of the user for accessing the FTP server. |
|
FTP Password |
Only available when selecting an "Output" of "EDI." Defines the unique password of the user for accessing the FTP server. |
|
File Encoding |
Pick list that allows users to enable a file encoding type of UTF-8 or Windows Code Page 1252.
|
|
Active |
If checked, the Trigger is active and will fire according to the conditions set. |
|
Template |
If checked, this record is used as a template to create other Triggers via the "Copy Trigger" button.
|
|
Add Line Feeds After Line Items |
If checked, the system creates a new line in the message for every new line item on a Sales Order. |
|
Accept Invalid Certificates For FTPS |
Only available when selecting an "Output" of "EDI." If checked, indicates that system will accept invalid SSL certificates.
|
|
SSH Protocol |
Only available when selecting an "Output" of "EDI."
|
Attachments tab
The Attachments tab allows customers to attach and send Grid Layouts, as MS Excel files, or Report Layouts, as PDF files, when using email Triggers. The tab can also be used to place Grid Layouts or Report Layouts in the path specified in the "Destination" field on the form when using an "Output" type of "EDI." Grid Layouts or Report Layouts may be attached to trigger emails when using either the "HTML Email" or "Plain Text Email" option in the "Output" field on the General tab. The name of the MS Excel or PDF file will be the same as the text specified in the "Subject" field. See the Sending attachments and reports using Triggers help section for more information on the process.
|
Button/Field/Flag |
Description |
|---|---|
|
Grid Layout |
Search box used to select the Grid Layout that will be attached to the trigger email or placed in the location specified in the "Destination" field on the General tab of this form. The list contains all active Grid Layouts in the system.
|
|
Print Out |
Search box that displays active Report Layouts based on the entry made in the "Table" field on the General tab. For example, if the Job Header (dtjob) table is selected, only Report Layouts with a type of "Job" will be visible in the list.
|
|
Export To Excel |
If checked, the Grid Layout that is emailed or placed in the Destinations location will be in MS Excel format.
|
User Group Master Security
In Deacom, security permissions for individual Users are assigned at the User Group level in User Group Master Security. The User Group Master Security form is used to edit the security permissions of multiple User Groups at one time. The form displays the permissions of each group compared to the others. User-level security restrictions override restrictions set at the group level. When a new security permission is introduced in Deacom, it is set to No for all users (including admins and top tier users) by default. Following the alteration of any security settings, the User must log out and log back in to Deacom for the changes to take effect.
System Navigation
- System > Maintenance > User Group Master Security
User Group Master Security form
The User Group Master Security grid displays one row for each security setting and User Groups are displayed in the columns. In the fields where the security settings and User Groups intersect, security will display as Yes or No. Setting a field to "Yes" means Users in that User Group are able to access, view, click, or perform the forms, tabs, fields, buttons, etc. detailed in the security setting.
User Groups
In Deacom, it is possible to assign security permissions at the group level according to the roles and responsibilities of the individuals within the groups. When an individual User is assigned to a User Group, all security permissions assigned to that group apply to the individual as well. If necessary, individual Users may have different security permissions from those of the Group.
Users must log out and log back into Deacom after their security permissions are edited for the changes to take effect.
System Navigation
System > Maintenance > User Groups
Edit User Group form
Opened via the "New" or "Modify" button on the User Groups form.
|
Button/Field/Flag |
Description |
|---|---|
|
Edit Access |
Opens the Edit User Access form, which is used to set security permissions for the forms, fields, and buttons throughout the system.
|
|
Edit Doc Access |
Opens the Edit Doc Access form, which is used to set permissions for Document Categories in the system. |
|
Edit Grid Access |
Opens the Edit Group Grid Access form, which is used to set permissions for Grid Layouts/reports in the system.
|
|
Published Data |
Allows the user to assign Published Data elements, such as Graphs to the selected User Group. |
|
Copy Favorites |
Allows the user to copy Favorites from a User and assign them to this group. |
|
Name |
Defines the name of the User Group, such as Accounting, Production, Quality Control, etc. |
|
Pre-fill Job Type |
Pick list used for WMS only to determine if all, Maintenance only, or Production only Jobs will be auto filled when selecting Jobs using the WMS > Issue Job transaction. |
|
Issue Type |
Option to set the Issue Type (via the "Type" field) for this User Group level when issuing and staging inventory in the main and WMS application.
|
|
Active |
If checked, this record is active. Only active records may be used in the system. |
|
Require WMS Settings on Login (requires WMS license) |
If checked, the settings menu will display each time a login on a WMS device occurs. Defaults to False. |
User Restrictions
User Restrictions limit Users' access to records and functions within Deacom. Restricted users will have restrictions indicated in the appropriate fields on all pre-filter forms in the system, but will be unable to access these fields. In addition to the pre-filter forms, user restrictions also limit the data that may be viewed or accessed in various search boxes throughout the system, including those on the pre-filter forms. User restrictions also affect the orders or items that will be available in transactions throughout the system. An examples is Purchasing > Drop Shipments transactions.
Note that Users must log out and log back in to Deacom for the changes to take effect. Additionally, Deacom administrators cannot remove their own restrictions; they must have other Deacom administrators change or remove restrictions for them.
The most common example of a User Restriction is the Facility restriction. If a user has a Facility restriction, they may only view records and perform functions for one Facility, usually the Facility in which they work. Specifically, when a user is restricted to one Facility, the Facility selection box will be grayed out in all pre-filters throughout the system, ensuring that a user may not select other Facilities. In addition, when using the order search boxes throughout the system to view Jobs, Purchase, or Sales Orders, a Facility-restricted user will only see orders belonging to their assigned Facility.
Example: A user is restricted to the "Philadelphia" Facility. When the user navigates to Sales > Order Reporting, the "Facility" field on the pre-filter will indicate "Philadelphia" and the field will be grayed out, preventing the user from modifying the field. In addition, if a user clicks the search box in the "Sales Order" field, on the pre-filter they will only be able to select orders that were created in the "Philadelphia" Facility.
The Facility restriction of "Philadelphia" will also apply when the user accesses Vendor or Customers records. In these cases, the "Facility" field on the pre-filter will indicate "Philadelphia" and the user will be unable to modify the field. If a Facility-restricted user clicks the search boxes on the pre-filter, they will only be able to select Vendor or Customer records that are assigned to the "Philadelphia" Facility. When restrictions are applied, records and report results will be included in the User's view if they do not have a restriction of that nature assigned. So, if a User has a Facility restriction and is attempting to view a list of Vendors or Customers, records that do not have any Facility specified will also be included in results.
System Navigation
System > Maintenance > User Restrictions > click "Modify"
System > Maintenance > Users >; click "New" or "Modify" > click "Restrictions"
Edit User Restrictions form
| Field/Flag | Descriptions |
|---|---|
|
User |
Displays the name of the User being modified. |
|
Facility |
Limits the user to create and view records with the Facility specified.
|
|
Facility Group |
Limits the user to create and view records with Facilities in the Facility Group specified.
|
|
Sales Rep |
Limits the user to only view and create transactions tied to the Sales Rep specified.
|
|
Sales Group |
Limits the user to only view and create transactions tied to Sales Reps in the Sales Group specified. |
|
Territory |
Limits the user to only view and create transactions tied to the Territory specified. |
|
Territory Group |
Limits the user to only view and create transactions tied to the Territory in the Territory Group specified. |
|
Broker |
Limits the user to only view and create orders tied to the Broker specified.
|
|
Formulator |
Limits the user to only view records and transactions tied to the Formulator specified. |
|
Item Planner |
Limits the user to only view records and transactions for the Item Planner specified.
|
|
Labor Group |
Limits the user to only view transactions tied to the Labor Group specified. |
|
Contact |
Limits the user to only view and create records (via CRM, Ticket Reporting, etc.) for the Contact specified.
|
|
Bill-to Company |
Limits the user to only view and create records and orders for the Bill-to Company specified.
|
|
Ship-to Company |
Limits the user to only view and create records and orders for the Ship-to Company specified.
|
|
Vendor |
Limits the user to only view and create records and orders for the Vendor specified.
|
|
Zone |
Limits the user to only issue, pick, and ship (without assigning Lots) from within the Zone specified.
|
|
Interface |
Pick list used to determine if the user is allowed to access legacy only, web only, or both versions of Deacom. |
|
Restrict SO Reports To Entered By This User |
If checked, the user may only view reports for Sales Orders they entered themselves.
|
|
Restrict PO Reports To Entered By This User |
If checked, the user may only view reports for Purchase Orders they entered themselves. |
|
Restrict Parts By Facility |
If checked, and the user has a Facility or Facility Group restriction, all part number search boxes in the system will only display parts with an active item facility (dmprod3) record matching their Facility or Facility Group restriction can be seen. |
|
Company |
Displays a list of companies a user may login to Deacom for. |
|
Access |
Indicates if the user is permitted to login to the Company specified.
|
Users
The Users section of Deacom contains a list of all users, both active and inactive. Each user record contains the user's login credentials, timeout minutes, general access information, and User Group assignment, as well as an "Edit Access" button to set a user's individual permissions. Users inherit the permissions of the User Group to which they are assigned. User-level access control can be used in situations where the specific user needs additional permissions besides those available for the User Group, or in situations where the specific user will be denied access to a few specific transactions or functions that are permitted at the User Group level. Security permissions set at the User level always override permissions set at the User Group level. When a new security permission is introduced in Deacom, it is automatically set to No for all Users (including admins and top tier users) by default.
To edit the security permissions for a single group, navigate to System > Maintenance > User Groups. To edit the security permissions of multiple groups at one time, navigate to System > Maintenance > User Group Master Security. Instructions on how to add or modify a User record and assign security permissions is available via Managing User Access and Security Settings.
Upon loading the initial Users form, a list of all active Users will be displayed and include information such as First and Last Name, Login Name, User Group, date of Last Login, and if the user is active and/or locked out. The "Display" button on this form may be used to display inactive or all Users.
System Navigation
System > Maintenance > Users
Edit User form
Opened via the "New" or "Modify" buttons on the Users form, the Edit User form is used to manage login credentials, User Group, Language, and application access.
|
Button/Field/Flag |
Description |
|---|---|
|
Edit Access |
Opens the Edit User Access form, which is used to set security permissions for the forms, fields, and buttons throughout the system.
|
|
Edit Doc Access |
Opens the Edit Doc Access form, which is used to set individual user access to Document Categories.
|
|
Edit Grid Access |
Opens the Edit Grid Access form, which is used to set permissions for Grid Layouts/reports in the system. The form displays a list of all Grid Layouts together with columns indicating the user's User Group access and the individual user's access to the respective Grid Layouts.
|
|
Restrictions |
Opens the Edit User Restrictions form, which is used to limit Users' access to records and functions within Deacom. |
|
Published Data |
Opens a mover form listing all BI and Graphs configured as Published Data that allows the user to assign reports to the selected User.
|
|
Copy Favorites |
Allows the user to copy the Favorites, which appear in the left-hand navigation pane of the main application, configured for a different User. |
|
First Name |
Defines the user's first name. |
|
Last Name |
Defines the user's last name. |
|
Login Name |
Defines the username that will be used to log in to the system, e.g. "asmith".
|
|
LDAP User |
Defines the user's network username. Used in connection with the "LDAP Domain" field in System > Options . Authentication tab to allow users to login into Deacom applications (WMS, Cash Register etc.) using their Deacom username and password.
|
|
Password |
Defines the user's password.
|
|
Confirm |
Confirms the password. |
|
PIN Code |
Defines the user's pin code used to login to the POS application. |
|
User Group |
Search field used to assign the User to a User Group. |
|
Language |
Search field used to assign the User a Language, if different than the default. |
|
Scaling Size |
Dropdown menu where users can have the system scale the size of fonts in the Deacom application based on the current monitors screen:
The default setting is "Width" in which case the system scales the fonts size based on the users screen width resolution setting. The option to change the scaling is helpful when users need to better adjust the screen in order to improve font size/rendering for Deacom top menu options and pre-filters more clearly, including monitors with 4x3 aspect ration. Example - If your current browser dimension/screen resolution is 1920 x 1280, and this field is set to "Height", the application will use this (1280, or 12.8) in order to perform the scaling calculations. If you choose to set this field to "Maximum", the system will perform both height and width calculations using the highest values returned. |
|
|
Defines the email address for the user. |
|
Email User |
Defines the username for the selected user. |
|
Email Password |
Defines the encrypted password for the user.
|
|
Email Signature |
Option to specify an email signature on outgoing emails. |
|
Outlook Contacts |
Links the User profile to the user's Outlook Contacts.
|
|
Outlook Calendar |
Links the User profile to the user's Outlook Calendar.
|
|
WMS Printer (requires WMS license) |
Pick list used to specify the default printer for this user when logged into the WMS application. The "None" option may be used to allow users to move to different locations in a warehouse or plant and select different printers on the scanner without being restricted to the printer set on their user record in the system. |
|
WMS Record Button (requires WMS license) |
Defines the keycode on the scanner that will be used to initiate voice input/recognition for this specific user. Options are: Custom Keycode, KEYCODE_BUTTON_L1, KEYCODE_BUTTON_L2, KEYCODE_BUTTON_R1, KEYCODE_BUTTON_R2, KEYCODE_PROG_YELLOW, and None.
|
|
WMS Record Key (requires WMS license) |
Defines the user defined keycode to initiate voice input/recognition on the scanner.
|
|
WMS Show Record (requires WMS license) |
Option to set an on screen recording button in the WMS application. Options are Hide, None, and Show.
|
|
Password Date |
Displays the date the last time the user changed their password. |
|
Timeout Minutes |
Defines the number of minutes the user can be inactive on a form in the system, including the WMS system, before they are logged out and forced to log back in.
|
|
Last Login |
Displays the date of the user's last successful login attempt. |
|
Active |
If checked, this record is active. Only active records may be used in the system. |
|
Access Main Application |
If checked, the user may access the main Deacom application. |
|
Access WMS (requires WMS license) |
If checked, the user may access the Warehouse Management System (WMS). |
|
Access Tracker |
If checked, the user may access the Tracker, used to enter support tickets and monitor issues. |
|
User Must Change Password At Next Login |
If checked, the user must change their password the next time they login to Deacom. |
|
Locked Out Due To Invalid Login Attempts Or Inactivity |
If checked, indicates the user is currently inactive.
|
|
Monitor Email Correspondence |
If checked, emails between this user and Contact People with the "Monitor Email" set to an option other than "None" will be tracked and stored as Contact Notes on the Contact record.
|
|
Limit Access To Single Application |
If checked, the User will only be permitted to access one Deacom application (Cash Register, WMS, Mobile, DSD, Tracker, AutoFinisher, and Main App) at a time.
|
|
Retain Printer Selection After Logout |
If checked, and a new printer is selected via File > Settings, the system saves the user's printer selection in a cookie and reloads it on their next login as long as they are using the same browser.
|
|
Device Approval Required |
If checked, the user will require device approval authentication prior to logging into Deacom.
|
|
Email Authentication |
If checked, the user will require email authentication prior to logging into Deacom.
|
|
Security Question Authentication |
If checked, the user will require security question authentication prior to logging into Deacom.
|
|
Use Outlook Desktop For Email |
If checked, when Deacom Local is running (Windows only) emails are opened using the Outlook desktop application rather than within Deacom.
|
|
Use LDAP Password For Email |
If checked, the system will use the LDAP Password on this form when emailing from Deacom. |
|
Access Deacom Restart |
If checked, this user will have access to restart the Deacom Web Services.
Notes: The restart option automatically runs a Performance Diagnostic Utility. The contents of Performance Diagnostic Utility dump (on screen) should look like those of a normal run of the utility when Export All is selected (correct number and similar size of files) |
Edit Doc Access form
Opened via the "Edit Doc Access" button on the Edit User form, the Edit Doc Access form is laid out the same and contains the same buttons as the Edit User Access form, but instead of listing security permissions, it lists Document Categories. Access to Document Categories can also be set at the User Group level via Document Category Security.
WMS Form Layouts
WMS Form Layouts are editing forms that allow users to specify what controls are visible on the main WMS forms (i.e. ones accessed from the main menu), the order of the controls, default control that will be focused on after scanning, default flag values, and even sort the onscreen display order to further streamline WMS processes. These customized layouts can be controlled down to User Groups or individual Users.
Within the main application, current layouts can me managed via the grid layout or new layouts can be added. When adding a new layout, the user will need to select what User or User Group this will be applicable for and which user form will be modified. Upon selecting a form, the grid will populate the fields available to that form in WMS. The individual fields can now have their visibility toggled, display order sequenced, and in the case of flags, select whether they default as checked or unchecked.
System Navigation
- System > Maintenance > WMS Forms Layouts
WMS Form Layout Maintenance form
Once users navigate to System > Maintenance > WMS Form Layout Maintenance, this form displays any user version of WMS forms layouts that have been previously created. From this form users can add, modify, or delete WMS form layouts.
WMS Form Layout form
Once users click the "Add" or "Modify" buttons they will be presented with WMS Form Layout form. If creating a new form layout, the form opens with the Receive PO WMS form as the default option and lists all the fields available to that transaction on the scanner. Users can change the selection via the "Form" field located at the bottom of the grid.
|
Field/Flag |
Description |
|
Form For |
Indicates the general selection of users that the WMS form will be used for. Options include All Users, Specific User, and User Group. |
|
User Group/User |
Select the specific user or user group to which the user version of the WMS form layout will be assigned, as effected by the Form For field above. Differences are as follows:
|
|
Barcode Format |
Search box to select a valid Barcode Format. |
|
Form |
Indicates the WMS form that is being displayed in the grid. Users may use the pick list to select additional WMS forms. |
|
Save Type |
Select the method of saving between Save and Save / Reset.
|
|
Commit on Scan |
The box is only enabled for the Issue Job, Input Production, Input Payroll Time, Final Staging Job, Final Staging Sales Orders, Reserve SO, and
|
|
Warn For Duplicate Scan |
The box is only enabled for the Issue Job, Input Production, Final Staging Job, Final Staging Sales Orders, and De-Issue Inventory options. The box is unchecked by default. When enabled, if a barcode is scanned that is identical to the previously scanned barcode, the user will be prompted with a Yes/No prompt on whether or not this is a valid scan or not. This allows the user to ensure unwanted duplicates are not accidentally scanned. |
|
Read Prompts |
If checked, when using Android OS, the system will read aloud screen prompts to the user (example - "invalid PO Number"). Users can say "Repeat" to have the prompt repeated. |
|
Modify |
Modifies the selected WMS layout. |
|
Sort |
Ability to define the order in which fields will appear on the scanner for the selected WMS form layout. |
|
Same As |
Allows the user to select an already existing WMS form layout and copy all values into the new form layout. |
|
Expires |
Expiration date textbox for Physical Inventory.
|
|
Make All Not Visible |
When clicked, all the WMS fields in the grid will have their "Visible" flag unchecked. Users can modify individual fields as needed to change the setting. |
|
Make All Visible |
When clicked, all the WMS fields in the grid will have their "Visible" flag checked. Users can modify individual fields as needed to change the setting. |
WMS Control form
Opened via the "Modify" button on the WMS form layout form.
|
Field/Flag |
Description |
|
Control |
Display only. The name of the selected control/field on the form layout. |
|
Default Value |
Option to determine if the fields default value will be inserted in the selected field in the WMS scanner application. |
|
Visible |
Ability to make the control/field visible. This field is checked by default. |
|
Default |
Applicable only for checkbox controls. Option to determine if the check box will be checked yes by default when the WMS form layout is loaded in the WMS transaction. |
|
Voice Output |
If checked, this field can be selected via voice recognition and the system will read the caption and data populated in this field back to the user. If the field is empty, "Empty" will be read back to the user.
|
|
Require Voice Confirmation |
If checked, this field must be selected/confirmed via voice recognition. If this field is checked, and after the system has read back the data to the user, the system will wait for the user to say "Confirmed" before moving on to the next field checked for Voice Output.
|
Note: In addition to the controls and fields on the WMS form layouts, the following voice commands are available to users when using Android OS:
- Repeat All - return to the first voice output field on the form and move through the sequences again.
- Repeat - repeat the last voice output field that was read.
- Enter - works the same as pressing enter on the scanner. The field the cursor is in will be used for the enter press.
- Put Away - For forms with the put away button, when the user says put away and a location type and location is populated, the system will read the 'Location Type' - 'X' and Location' - 'X' fields to the user.