Deacom Public API Setup-On Prem
This page will provide on premises customers with the necessary information to setup the Deacom API. For information on how to setup the API for Cloud installations see the Deacom Public API Setup-Cloud page.
Note:
- On Prem Enterprise customers will need to perform all the sections on this page to use the Deacom API.
What is the Deacom API
The Deacom API is a platform that uses a public-facing Application Programming Interface (API) to allow access to the Deacom Database through the exposed tables and fields or endpoints to provide a comparable level of access when compared to direct SQL access with increased capabilities such as logging and concurrency checking. The Deacom Public API is a CRUD API, a Create, Read, Update and Delete API.
The Deacom API is a Windows service and is a separate entity with regard to the Integration service. Often, it is simply referred to as "Deacom Service" or "Deacom API." However, in Windows Service Applications (formerly known as "Services") it is shown as Deacom Service: Deacom API. This service has features that will analyze the environment (Cloud or On-Premises,) detect your company, determine the location of your databases, and it will behave accordingly.
Required Prerequisites and Domain Knowledge
Software prerequisites
- An ASP NET Web Hosting Bundle must be installed on the server where the API will be hosted. The bundle provided by Microsoft is suitable: https://learn.microsoft.com/en-us/aspnet/core/host-and-deploy/iis/hosting-bundle?view=aspnetcore-9.0
- An HTTP certification. This is required to setup the IIS site. Customers should coordinate with their IT department for this step.
Domain knowledge
Customers and 3rd party Users and Developers should have:
- A working knowledge of how to use REST APIs and accessing them with either a Swagger document or an external program such as Postman
- A working knowledge of the JSON language and how to form JSON packages for API consumption
- An understanding of the Deacom database including the following:
- Tables relationships
- What is needed to create a valid record in Deacom
NOTE:If a customer or a 3rd party does not possess the above knowledge, they must purchase training hours with Professional Services Custom.
Before You Begin
If you have any instance of the API running, you must stop the service. If you have ever run the API for any part of Deacom, there is a chance that the service is running.
API Server Install - New Deacom Installation
New Installation with the Deacom Setup Wizard
- Ensure the ASP NET Web Hosting Bundle is installed on the server where the API will be hosted
- Run the Deacom Setup Wizard and fill in the appropriate information as seen in the example screen below
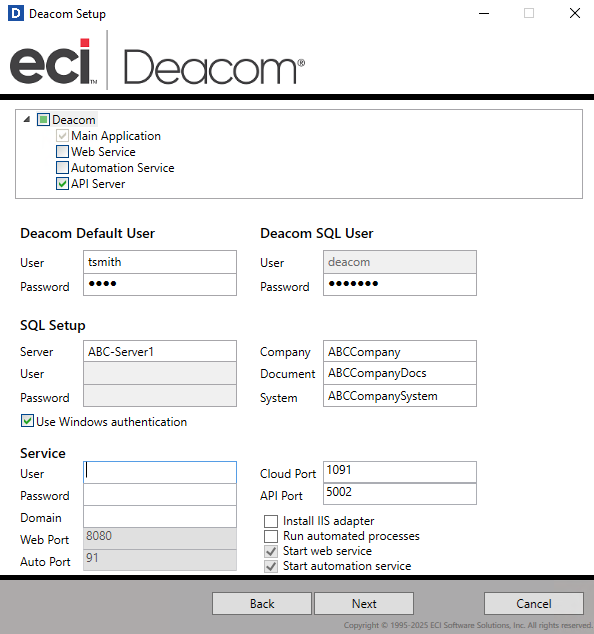
- NOTE: - The screen above shows a typical configuration. If desired, users may check the boxes for setting up the "Web Service" and "Automation Service" as a well as filling in any other fields. The Web Service and Automation Service are for Deacom Main App where as the Deacom API Server is separate.
- NOTE: The API Server does not require a license.
- API Server - make sure this is checked. Note: the server specified below should be the same one where the ASP NET Web Hosting Bundle is installed.
- Deacom Default User - any registered Deacom user.
- Deacom SQL User - enter the appropriate password for access to the 'deacom' Sequel Management System user. This is the user that is defined on the SQL Server where the Deacom Databases are installed.
- Fill in or mark the additional fields as seen in the example screenshot above.
- NOTE: (
- Click "Next"
- You will receive a screen similar to the below confirming the location of the installation.
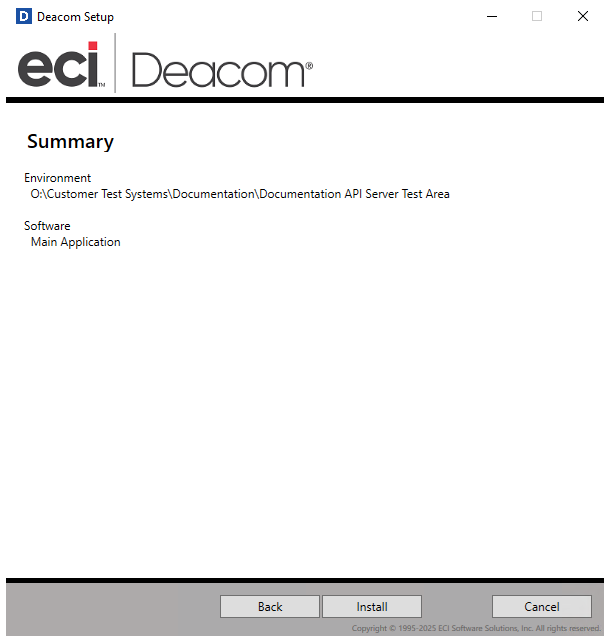
- Ensure the information is correct and click "Install"
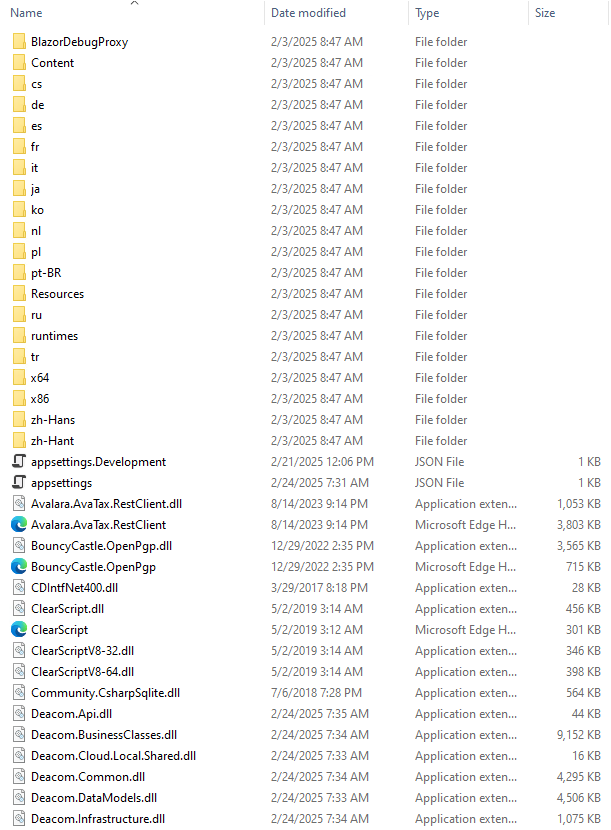
- Once the installation process is complete, navigate to the location where the Deacom application was installed, and within that folder there should now be an "APIServer" folder with the structure below.
API Server Install - Updating an existing Deacom installation
Updating is similar to the process used when creating a new installation and installing an API Server. Be sure to perform the following checks/steps listed below before you begin.
- Check to see if an "APIInstall" folder already exists in your main Deacom application folder. If this is the case, users can skip the process of running the Deacom Setup Wizard and pick up with the "Setting up the IIS site for public use" section further below.
- If the "APIInstall" folder is not present, but you already have a Deacom system running on your server, then proceed with the steps below.
- NOTE: During updating, the API files in the API server folder (which is located inside the Deacom production folder) will be updated. If for some reason, in the IIS setup, this folder is located somewhere else, then after updating you will need to copy the folder from the production folder to the IIS folder.
New API Server Installation, on an existing Deacom system, with the Deacom Setup Wizard
- Run the Deacom Setup Wizard
- Enter or confirm the information just the same as was done in the previous section above. That screen is shown here again below:

- Click "Next".
- The next screen will confirm the location of the installation.
- Ensure the information is correct and click "Install". NOTE: YOU WILL RECEIVE A PROMPT ASKING IF YOU WANT TO REMOVE THE EXISTING DATABASE. CLICK NO TO THIS PROMPT TO AVOID HAVING YOUR EXISTING DATABASE DELETED
- Allow the installation process to continue.
- Pick up with pick up with the "Setting up the IIS site for public use" section further below.
Note: (
Setting up the IIS site for public use
- Run Windows IIS Manager or applicable software
- On the left menu of the IIS Manager, click on Site > Add Website
- When setting up the IIS Site, the following must be setup on the Add Website form:
- Enter a site name
- The "Physical path" field must point to the location of the "API Server" folder in the Deacom system folder.
- "https" must be selected in the Binding area.
- Customers will then need to contact their IT Department/Provider to obtain a valid certificate and add it to the site that will be created as indicated in the "Site name" field below
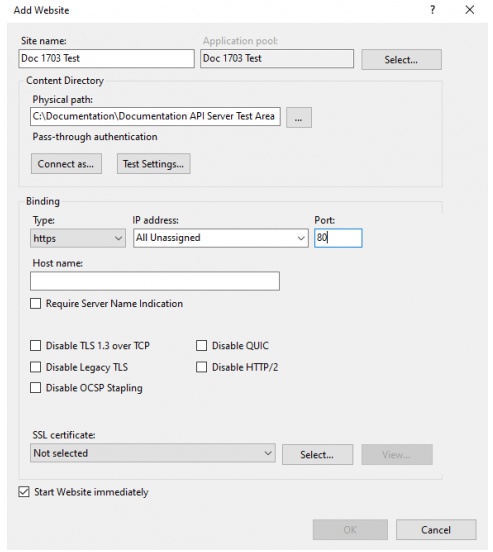
- Once all the necessary steps are completed, Click "Ok" on the "Add website" form.
- Then start the service/site and allow it to load.
- In the IIS Manager software, click on the "Browse Website" option (located on the right side menu) for the website you have created for the Deacom API. This is the URL that will be used for API Calls.
Import API Credentials
On premise customers will be supplied with sets of API Credentials from Deacom as well as the import credential tool described below. Note: The import credential program must be placed in and run from the Deacom install folder.
- Integration Engine API credentials - Required. Provides access to the Integration Engine used by ECI for APIs. These credentials are unique to each Deacom customer.
- Deacom API Credentials - Used to authenticate with Deacom. Optional. These credentials are not required. Can be used in Postman and other related tools.
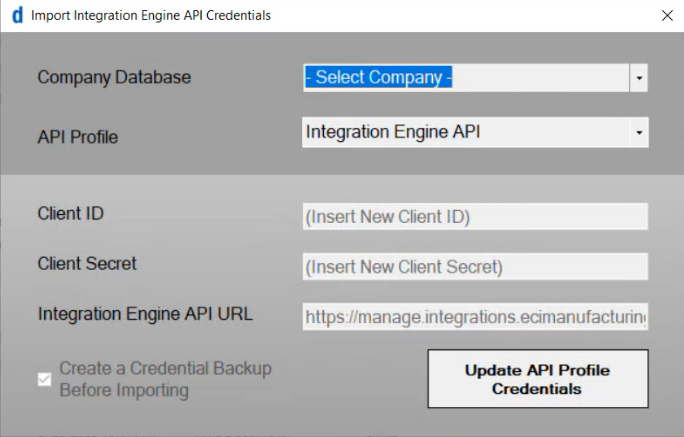
Importing Integration Engine API Credentials
Users will open the credential information provided by Deacom and use as indicated below for the Integration Engine API Credentials.
- Company Database - Select the Deacom Company Database that will be updated with these credentials. If you do not have multiple company databases then the default will be populated in this field and can be left unchanged.
- API Profile - select Integration Engine API
- Client ID - copy the one provided by Deacom.
- Client Secret - follow the steps below to generate the secret and then copy that secret into this field on the form:
- Open a browser session and use the URL provided by Deacom that indicates this is for the Client Secret. (for the Integration Engine API Credentials).
- Click the "Show Password" button. NOTE: This is a one time use password that must be immediately copied after you click the button. If this is not done, then you will need to contact the ECI-Deacom team to have new ones generated.
- Once the password has been copied, paste it into the Client Secret field on the form.
- Integration Engine API URL - Paste the URL provided by Deacom in this field. This URL is listed at the bottom of the information provided by Deacom and is different than the URL used above to generate the Client Secret.
- Create a Credentials Backup Before Importing - Leave this checked.
- Update API Profile Credentials - Once all the information has been entered click this button. You will receive a success prompt and information on the location where a backup of the credentials have been saved. (Tech Note: The dxapiprofiles table in the database will be updated with the newly generated and imported credentials. The profile updated by this process will not be visible in the application front end.)
Importing Deacom API Credentials
Users will open the credential information provided by Deacom and use as indicated below for the Integration Engine API Credentials.
- Company Database - Select the Deacom Company Database that will be updated with these credentials. This is the same as the database selected for the Integration Engine API credentials.
- API Profile - select Deacom API
- Client ID - copy the one provided by Deacom.
- Client Secret - follow the steps below to generate the secret and then copy that secret into this field on the form:
- Open a browser session and use the URL provided by Deacom that indicates this is for the Client Secret (for the Deacom API Credentials).
- Click the "Show Password" button. NOTE: This is a one time use password that must be immediately copied after you click the button. If this is not done, then you will need to contact the ECI-Deacom team to have new ones generated.
- Once the password has been copied, paste it into the Client Secret field on the form.
- Deacom API URL - NA - not provided or required for the Deacom API.
- Create a Credentials Backup Before Importing - Leave this checked.
- Update API Profile Credentials - Once all the information has been entered click this button. You will receive a success prompt and information on the location where a backup of the credentials have been saved. (Tech Note: The dxapiprofiles table in the database will be updated with the newly generated and imported credentials.)
FAQ & Diagnostic Tips
Rate Limiting -