Deacom Cloud Local
Deacom Cloud Local makes network-accessible peripherals inside a customer’s network, such as printers and scales, available to a Deacom application server running off-premises. It is intended for Deacom managed cloud environments, but it can also be used any time the application server is not on the same local network as the hardware.
Cloud Local complements Deacom Local. Deacom Local runs on each user’s workstation and makes that workstation’s peripherals available to the browser session running Deacom. Cloud Local runs as a Windows service on a central machine and makes shared, network-accessible peripherals available directly to the Deacom application server. This allows all clients, including browser users, mobile users, and WMS users, to use the same devices.
Each Cloud Local instance connects to one Deacom web server and one WMS server. The application identifies each instance by public IP address and port number.
See Deacom Cloud Local - Previous Versions if needed.
Setup & Configuration
Prerequisites
Before configuring Cloud Local, confirm the following:
- The customer has a Deacom application server running off-premises.
- A reliable, always-on Windows machine is available to host the Cloud Local service. An existing print server is often the best choice.
- The peripherals to be exposed are network-accessible from the Cloud Local host.
- A Cloud Local port value has been assigned for each system, such as Production, Test, and Validation.
- The customer has the required access to install and configure the service.
In hosted environments, the customer is typically given a Cloud Local port value for each system. In self-hosted environments, the port value corresponds to the CLOUDLOCALPORT setting in deacom.ini.
Configuration
In most environments, deploy Cloud Local by system rather than by server. Use one instance for Production, one for Test, and one for Validation. Install each instance on a stable Windows host that can remain available to the Deacom application server.
When configuring the Deacom Cloud Local Options application, enter the Cloud Local Port value assigned to that system. In hosted environments, this is the value provided to the customer. In self-hosted environments, this value should match the CLOUDLOCALPORT setting in deacom.ini.
Use a unique port for each Cloud Local instance. This keeps the instances separate and allows the Deacom application to identify them correctly by public IP address and port number.
Multi-Site Variations
Some customers need more than one Cloud Local instance for the same system. This is usually only necessary when they have facilities in different physical locations that are not connected by VPN. In that case, each site has a different public IP address, which allows the application to distinguish between instances.
This model lets each facility expose its own local peripherals while still connecting to the same Deacom system. When this is required, deploy one Cloud Local instance per site and assign each one the correct public IP and port.
Troubleshooting
If Cloud Local does not connect correctly, start with the port configuration. Confirm that the Cloud Local Port in the Deacom Cloud Local Options application matches the assigned port for that system. In self-hosted environments, verify that it matches CLOUDLOCALPORT in deacom.ini.
If the instance is not reachable from Deacom or WMS, confirm that the Cloud Local service is running and that the host machine is available on the network. Also confirm that the intended peripherals are reachable from the Cloud Local host.
If a customer is running more than one Cloud Local instance, verify that each instance has a unique port and that each one is associated with the correct system or site.
Summary
Cloud Local provides a central way to expose on-premises peripherals to off-premises Deacom users. The key setup points are to deploy it by system, assign the correct port value, and use separate instances only when multiple sites or network boundaries require them.
Step-By-Step Instructions
Server
- Identify the server that will run Deacom Cloud Local and install and configure the desired printers.
- Obtain a copy of the Deacom Cloud Local installer. Since the Deacom application server is not accessible, Cloud customers can request a copy of the installer to be placed in their client FTP directory.
- Run Deacom.Cloud.Local.Installer.msi on the server that will host the Deacom Cloud Local service.
- The installer will create a shortcut to Cloud Local Options on the desktop.
- Double-click the shortcut to open the Cloud Local Options dialog.
Set the Service URL and Service Port to the public hostname and port of the Deacom application server. See the example Cloud Local Options screenshot below for more information.
- Please note, it is essential to input the "https://" in the address in order for Cloud Local to properly function.
- Set the Local URL and Local Port to the public IP of the location running Cloud Local and the port that is opened in the client site firewall and forwarded to the internal machine hosting the Cloud Local service. Note: Enhancements have been made to Cloud Local versions that remove the need to make changes to firewalls. This step may only apply to earlier versions.
- In the list of printers displayed, select each printer that should be made available to the Deacom application server.
- Save and close the Cloud Local Options dialog.
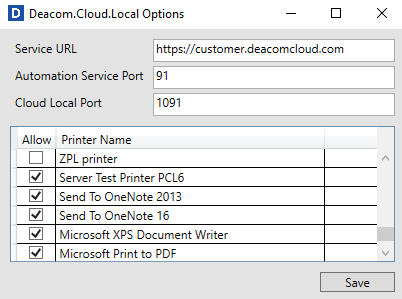
(Image above varies by version)
Firewall
Note: Enhancements have been made to Cloud Local versions that remove the need to make changes to firewalls. This following section may only apply to earlier versions.
Configure the customer network firewall and Cloud Local server firewall for Cloud Local traffic. The Cloud Local service connects to the Deacom application server with instructions for establishing a connection back to the Cloud Local service running on the customers network.
The customer will need to make the following firewall changes:
Network firewall
- Create an incoming Access Rule to allow incoming traffic from the Deacom appserver IP on any port to the customer public IP and port.
- The Deacom appserver IP is the same IP that the scanners connect to. It can also be found by pinging the web URL (Service URL) or requesting it from the Deacom team.
- The customer public IP and port are the same as the Local IP and Port from Cloud Local Options. See the Cloud Local Options screenshot for more information.
- The Deacom application server will use a random TCP port to connect to Cloud Local. To prevent communication issues please allow all ports.
- Configure a NAT to translate the customer public IP and port to the private IP and port of the server running Cloud Local.
Cloud Local server firewall (if needed)
- Create a firewall rule to allow incoming traffic from the Deacom appserver IP on any port.
Additional Steps
To confirm the printer is accessible using the main application
- Navigate to any location in the system where you can print something (grid, lot label, etc.).
- When selecting a printer, verify that the printer(s) you selected are shown as available printers with the label (Cloud Local).
- Print to a Cloud Local printer. Verify that the label/form/report prints correctly and to the correct printer.
- If desired, try to print a ZPL label to a ZPL printer. Verify that the label is able to print correctly.
To confirm the printer is accessible using the scanner
- Navigate anywhere in WMS where you can print something (such as Find Inventory or finishing a job).
- When printing, verify that the printer(s) you selected are shown as available printers with the label (Local).
- Print to a Cloud Local printer. Verify that the label/form/report prints correctly and to the correct printer.
- If desired, try to print a ZPL label to a ZPL printer. Verify that the label is able to print correctly.
To setup Deacom Cloud Local for non production environments (Test, Validation, etc.), please follow these instructions.
- Navigate to Deacom Cloud Local install path (default is C:\Program Files\Deacom).
- Copy ‘Cloud Local’ directory and name it ‘Cloud Local Test’.
- Go into ‘Cloud Local Test’.
- Run Deacom.Cloud.Local.Options.exe and update the options as desired per the Setup section.
- Run the following command from an elevated Command Prompt
- Sc create Deacom.Cloud.Local.Test binPath= "C:\Program Files\Deacom\Cloud Local Test\Deacom.Cloud.Local.Service.exe" depend= nlasvc/pla start= auto displayname= “Deacom Cloud Local Service Test” obj="NT Authority\NetworkService"
- Start the new service.
- Confirm that the printer is accessible when using the main application and the scanner.
Troubleshooting and monitoring active Cloud Local connections
The system will add logging to the cloud local connection management in the Deacom Web Service. Every hour, each active cloud local connection's client IP, client port, and available printers will be written to the Windows Event Log under the source "Deacom Web Service"