Entering Production and Stability QC Test Results
Quality Control testing during or after production ensures that required QC tests are performed when materials are produced and finished on production Jobs. Quality Control is an optional feature within DEACOM, with a wide array of application ranging from completely turned off to extremely strict requirements, and are established on an item by item basis. This means that some items can have absolutely no quality control, while others can have many required QC tests. This page covers both during and after production QC processes.
During production QC testing handles the following scenario:
-
Test results are required at multiple stages or prior to the continuation of production.
Post production QC testing handles the following scenarios:
- Entry of post-production QC results.
- The entry of QC for at-risk Lots transferred to another Facility. This option is designed to be used in connection with the header Job functionality, meaning a header Job is created for an Inter-Company Transfer and the Job contains the appropriate BOM with the QC Group identified and flagged to "Finish To At-Risk". When the Inter-Company Transfer is received, the entry of QC results is accomplished on the header Job via Production > QC Results Entry. This option was initially designed for situations where items would be produced and transferred to another Facility within the same company before the entry of QC results could be accomplished.
Note:
Configuration
In order to perform production QC Testing, there are certain items within the system that need to be set up, including:
- Items - Must be configured for production. Refer to Designing a Part Numbering System and Creating Parts for more information.
- Formulas - Bills of material (BOMs) should be created and assigned to items and QC Groups should be assigned to these BOMs via the QC/Stability Tests tab. Refer to Managing Formula Revisions for more information.
- Quality Control Tests - Describes the base name of the test to be performed in the system. Once created, QC Tests are assigned to a Quality Control Group. Refer to Managing QC Tests for more information. Deacom
- Quality Control Groups - List the sequenced QC Tests for the group to perform. Any tests from above should be assigned to appropriate QC Groups for testing. The setting that determines whether QC testing will be performed after production is the “Do QC After Production” flag on the QC Group. Refer to Managing QC Tests for more information.
- QC Security Groups - Allow individual users to be assigned to specific QC Tests for the purpose of QC entry and approval. QC Security Groups are assigned to each QC Test when the test is added to a QC Group. Users or user groups are then assigned to the appropriate QC Security Groups via System > Maintenance > Quality Control Group Security. Refer to Managing QC Tests for more information.
Note: Deacom
Process
Planning QC during MRP Job creation
DEACOM offers a method to help companies determine if they can consolidate production jobs based on customer specific QC requirements for specific parts. This feature leverages Customer Part Cross References in the system together with the item master "Plan QC During MRP Job Creation" flag and a few other options. This feature is helpful for companies who want the ability to view customer specific QC requirements when viewing the sales order demand in MRP to determine if customer item QC specs which are nearly the same could be grouped on the same production job, or if separate jobs would be needed. The ability to do this within MRP offers a type of pre-production planning process in which viewing the demand in MRP, together with customer specific QC tolerances, allows companies to make these decisions during the job creation step. See the Planning QC in MRP and Managing Customer Specific Quality Specifications pages for additional information.
Performing production QC testing
QC results can be entered before or after production occurs.
How are initial test results entered before production begins on a Job?
The entry of test results prior to production is accomplished via the "QC Values" button which is available when modifying a job, via the buttons menu in various Job reports, or on the Close/Relieve Job form, which is displayed by clicking the "Close/Relieve" button in various Job reports.
- Navigate to Production > Job Reporting. (If entering test results while modifying a job, users can click the "QC Values" button during order entry, after the job is saved. At this point users can pick up with step 4. below.)
- Select a "Report Type" of "Job Summary", enter the filters as desired, then click "View" to generate the report.
- Select a Job whose item(s) contain a BOM revision with a QC Group that does not have the "Do QC After Production" flag checked and click the "QC Values" button at the top of the report. (users may also click the "Close/Relieve" button, and the "QC Values" button on the Close/Relieve form, or click the "Modify" button, and the "QC Values" button on the Job Entry form.)
- The Quality Control Results form will be displayed. Notes: 1. If a user navigates to the Close/Relieve form, and the job contains an item with a BOM revision with a QC Group marked for after production, the "QC" column on the Close/Relieve Job form will indicate this and the "QC Values" button will not launch the Quality Control Results form. 2. If a user click the "QC Values" button on the Job Summary report or on the Job Entry from for a job with a BOM revision containing a QC Group marked for after production, the system will display a prompt indicating that no QC values exist for the job.
- On the Quality Control Results form, click "Add" to open the Edit QC Results form, which contains all QC Tests for this group.
- Enter the appropriate information in the "Value" column for each test. If the test is marked as required and no additional QC passes or results will be entered for the test(s), check the "Complete" flag; otherwise, leave the "Complete" flag not checked.
- Note: QC Tests can be setup in a variety of ways and the information users will enter on this screen depends on that setup. Some tests may or may not indicate a minimum and maximum value. Others tests may require that a value be entered before a test is marked as complete and still others will indicate that the test value must be between the minimum and maximum values before continuing.
- Once all appropriate QC values have been entered click the "Apply" button on the Edit QC Results form to commit the test results and close the form.
Note: DEACOM offers a QC testing process for issuing materials. This option is controlled by the "QC To Continue" field on the Edit BOM Line form. If this field is populated, users may enter testing results using the same process detailed in the section above. Additional information is available via the Bills Of Materials help page.
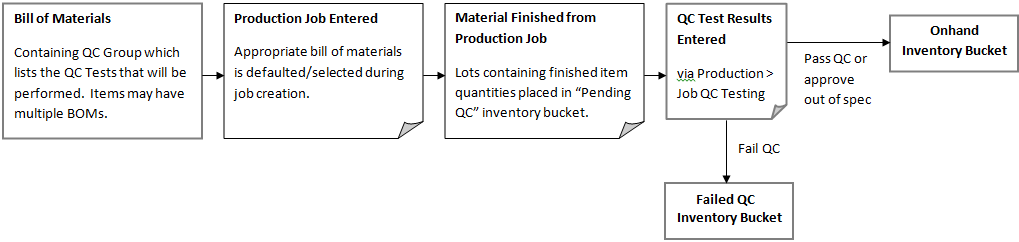
What is the post-production QC process flow?
The graphic below demonstrates the post-production QC process from setup, to Job processing, to the entry of QC results, and finally the placement of items into the appropriate inventory segment based on the results of QC testing.
How are initial test results entered after production is completed on a Job?
Jobs do not have to be closed in order to perform after production QC testing. Once materials on a Job are finished, the Lots will be available for testing.
- Navigate to Production > QC Results Entry.
- Enter filters as desired to select the Job(s)/item(s) for which QC results will be entered then click "Continue". Only items that have post-production QC Groups assigned will be displayed in the list. In addition, if multiple finishes were performed, the list will contain a line for each quantity finished. For example, if a production job contains one finished good for a quantity of 10 and two different finishes were performed for 5 each, the list will contain two lines, one for each finish.
- Move the desired record(s) to the right-hand side of the mover form then click "Continue". Multiple records may be tested simultaneously, provided all the items have the same QC Group assigned and all QC Tests within that group are the same.
- On the Quality Control Results form, click "Add" to open the Edit QC Results form, which contains all QC Tests for this group.
- Enter the appropriate information in the "Value" column for each test. If the test is marked as required and no additional QC passes or results will be entered for the test(s), check the "Complete" flag; otherwise, leave the "Complete" flag unchecked.
- Note: QC Tests can be setup in a variety of ways and the information users will enter on this screen depends on that setup. Some tests may or may not indicate a minimum and maximum value. Others tests may require that a value be entered before a test is marked as complete and still others will indicate that the test value must be between the minimum and maximum values before continuing.
- Once all appropriate QC values have been entered click the "Apply" button on the Edit QC Results form to commit the test results and close the form.
What actions occur after test results have been entered?
Once QC results have been entered and saved, the process of finishing QC results depends on the outcome of the testing performed, company policies, and whether or not separate approval is required. Results may be simply finished, approved, failed, and/or marked at-risk. These and other options, such as re-testing or reworking material, performing multiple testing passes, performing QC on Lots in transit, completing empty QC Tests, and un-grouping/re-grouping already tested Lots are described in the "Process options" section of the Quality Control Results page. Process steps for each of these options are covered in the Approving QC Results, Failing QC Results, Managing At-Risk Inventory, Re-testing Material, and Entering Production Jobs Using the Custom Adds Feature pages.
The next steps depend on both the settings contained in the QC Group and the company's QC process.
- Marking items at-risk or Performing additional tests - If additional testing passes are to be performed, users may click the "Mark At-Risk" or "Exit" buttons without finishing, failing, or approving QC. Multiple QC results may be entered as necessary provided the QC Test(s) have not been flagged as "Complete" on the Edit QC Results form and the QC process has not been finished by clicking the "Finish QC" button. The at-risk option is used for assumed good materials that will be issued, reserved, and/or shipped prior to performing additional QC Tests. Process information on marking items at-risk is available on the Managing At-Risk Inventory page. For information on how to perform multiple passes, refer to the "Performing multiple QC testing passes and adding additional QC Tests" section of the Approving QC Results page and the Re-testing Material page.
- Approving or Failing results - If all results have been entered, users may check the "Approve QC" flag, if approval is required and the user is authorized, or the "Fail QC" flag if the material has not passed testing. Process information is available on the Approving QC Results and Failing QC Results pages.
- Finishing results - Once the QC process has been completed, users may click the "Finish QC" button to display the Finish QC form. Enter or verify the correct Location and Lot Attribute information, then click "Continue" to place the Lots into On Hand inventory or Failed QC, depending on previous actions. Once this "Continue" button is clicked, the system will move the inventory to the correct Location, close the Finish QC form, return the user to the Close/Relieve Job form or the Job QC Items form, depending on if results were entered during or after production, respectively, and complete the QC entry process.
How are stability tests entered for produced materials?
The process to enter stability tests for these item lots is the same process as indicated in the initial test results section above except that users will only be prompted to enter results for stability test only.
Modifying QC results on inventory reports
The "QC Values" button can be set to allow users with the correct access to modify QC Values on the Inventory "History" and "Lots" reports. If the user has the security option "Inventory -- modify QC results" set to Yes, the modify option will be enabled on the View QC form, even if the Lot has been shipped or the Job has been finished. If desired, the "q5_approvedby" field (form the dtqc5 table) can be added to the View QC form. This variable will indicate the user name of the user that approved QC results, which may be different than the user who entered results. This field is available to the Job and PO Detail/Summary reports as well as the View QC form.
Entering QC results on lots moved to QC Pending
FAQ and Diagnostic Tips
Why is my QCINFO block (lc_qcinfo field) on my batch ticket only printing 3 decimals?
QC results will print based on the "QC Text" field in Inventory > Options > Printing tab. Add or modify the STR commands for QC fields to reflect the number of decimals you need. For example, str(q2_min, 10, 4) will print the first 10 characters of q2_min returning 4 decimals. Reference complete information on the STR command at DEACOM Basics > Functions and Operators Library.
When I go to enter QC in Production, it is not showing any QC tests when my BOM is assigned QC. What is the problem?
The job was likely created before the BOM had QC attached. Modify existing Job and reselect item to get the current BOM version with QC.
Can I see which users approved, not just entered, QC results?
Yes, The q5_approvedby field (form the dtqc5) table can accomplish this. This variable will indicate the user name of the user that approved QC results, which may be different then the user who entered results. This field is available to the job and po detail/summary reports as well as the view qc form.
I am trying to enter QC value but it is not letting me enter the full number. What is the problem?
Check the setup for the tests in the Quality Control Group. The QC Groups are maintained in Inventory > Maintenance > Quality Control Groups. Make sure if there is something in the picture field that it is the correct picture. For instance, if the Picture field is "9", you would only be allowed to enter one number.
I have a part in production QC testing that is showing an insufficient inventory message when I try to approve the QC. How do I get the part out of Production QC testing?
Check the expiration date on the lot. A lot with an expired expiration date will cause this message to appear. Changing the expiration date to a future date will allow you to approve the QC.
Can I View QC Test Results When Issuing & Selecting Lots
The results of QC tests can be viewed on the Inventory > Issue/Reserve Inventory and "Select Lots" forms and grids throughout the system. This is accomplished by adding the QC tests to the grid layouts. This option allows customers with high volumes of transactions and/or QC test results to more easily view these results when selecting and issuing lots.
Can QC results entered for non stock parts be displayed in Production reports?
Yes,
I can see that there are QC results for a part, but they are not printing on my form. What should I do?
Please verify that the tests are marked to print on forms. Navigate to Inventory > Maintenance > Quality Control Groups. Highlight a group and click "Modify". Select a test and click "Modify". Verify the "Print on forms" box is checked. Do this for every test in the group you wish to print on forms.
Tip: If using the "Finish Job Pre-Staged to Subsequent Jobs" item master property, the system will automatically place inventory into staging after entering QC results.
Can multiple users enter QC results at the same time?
Only one user can enter results at a given time, however if they are timed out due to inactivity the system will wipe their unsaved changes and kick them off the screen so another user can enter results instead When modifying an existing QC group, including QC tests on the group, the system checks to see if there are open jobs using this QC Group or if there are lots in Pending QC using this QC Group that have QC values already entered.
TIP: When modifying an existing QC group, including QC tests on the group, the system checks to see if there are open jobs using this QC Group. If open jobs are found with the QC Group, the system will prompt users asking if they wish to the update the QC Group on these jobs.