Inventory Flow and Reporting
The Inventory Reporting pre-filter (formerly referred to as the Inventory Management pre-filter), can be used to generate many different reports. The most commonly used are On Hand, Locations, Lots, and History. For descriptions of the report types available, refer to the Inventory Reporting page. Depending on the report generated using the pre-filter, users can drill into a specific line to get more information. For example, if running an On Hand report, users can double click a line to open the Lot Summary report for that item, then double click any resulting line to open the Lots report for selected lot. In addition, many of the inventory reports contain buttons to allow for moving and adjusting inventory. The advantages of performing adjustments or moves on these reports is that specific lots and locations will already have been selected on the Adjustment/Move form which means less information will need to be entered and the potential for mistakes can be reduced.
Configuration
There is no required setup to use the Inventory Reporting feature.
Process
Understanding inventory segments and QC Status
In DEACOM, inventory is stored in many different buckets or segments, depending on the status of the material or item in question. In addition, all inventory will be marked with a QC status, with "Not in QC" being a valid option. The inventory’s bucket and QC status will impact visibility to reports based on pre-filter options and what transactions are able to be performed to that inventory. The different inventory segments and QC statuses currently used in DEACOM, including which segments or statuses are visible in MRP and in what column they can be found on the MRP report, are described in detail by the "View" and "QC Status" field descriptions in the Inventory Reporting page.
It is important to understand that inventory segment and QC status are different, and to have a clear picture of inventory’s status both buckets are key. The ability to execute transactions is impacted by both segment and QC status, and users must understand each so they can successfully identify and work with their inventory.
On the Inventory Reporting pre-filter, the "View" pick list selects Inventory Segments, while the QC Status is selected through the "QC Status" pick list.
Following inventory flow in DEACOM
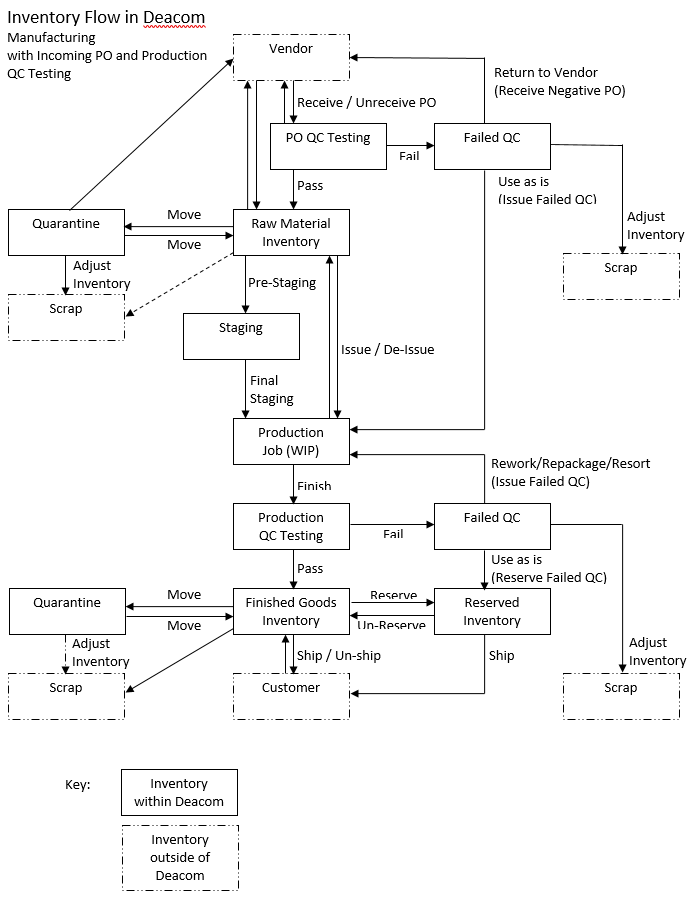
Inventory within DEACOM can flow through different inventory segments depending on the status of the material in question. For example, material recently received from a vendor may be held in the PO QC inventory bucket pending inspection. The graphic below demonstrates all the possible scenarios or “flows” for a manufactured material requiring raw material purchases and production QC testing.
Breaking down available inventory options
DEACOM offers many ways to configure Parts and track inventory within the system. These available configurations are described below with links provided that contain process information on how to configure and use the option.
- Kitted Parts - Kitted Parts are used for Finished Goods for which inventory is kept on hand. The components will remain in stock and the user will be prompted to pick them during the reserving process, after which the kit will then be assembled and shipped on the order. Additional information on Kitted Parts is available via Using Kitted Parts.
- Catch Weights - Catch Weights are used when finishing or receiving a Part that has a variable weight, such as packaged food products like ground beef. The actual weight recorded during production/receipt is compared to the default/estimated weight to ensure the proper quantities of product move through the system. Catch Weight is stored on the Lot or Serial Number that identifies a single package of the product. Since the exact weight of each package varies, it must be entered for every purchasing receipt or production finish that brings a catch weight inventory item into the system. Moving and selling a catch weight item does not require entering the weight, since it has already been recorded on the Lot or Serial Number. DEACOM supports encoding catch weight into packaging barcodes to automate the entry process. Additional information on Catch Weights is available via Using Catch Weight Parts.
- Container Units - A "Container Unit" is a Unit of Measure that is different from the unit used in either stocking or selling a product. For instance, oil may be stocked and sold by the gallon but received and shipped in 55-gallon drums. To keep track of this, an Each type UOM should be configured that converts to the number of gallons it can hold - 55 in this example. When receiving inventory in this container unit, DEACOM will record that info onto the System Lot created for it. This makes reserving and picking inventory easier, since DEACOM will know to reserve the entire container’s quantity.
- Serialization - Serialization, available on a unit or container basis, is used to assign unique traceable numbers to individual saleable units or containers. Assigning serial numbers allows a user to trace the movement of goods in production at each stage of the process along with shipments to customers. With unit serialization, DEACOM tracks each individual stock unit of an item by its unique serial number. If an item is stocked by the case, sack, bottle, or box then each of those individual cases, sacks, bottles, or boxes would have their own unique serial number. This would not necessarily mean that it is the lowest unit getting the unique number. The case may contain 10 cans, but all those cans would be included under the unique serial number of the case if the stock unit was a case. This is especially useful for pharmaceutical and nutraceutical manufacturers, since the FDA is increasing traceability and serialization requirements for drug-based products. With container serialization, a user can put multiple Lots or unit serialized items into a container that is then serialized. It is not based on the stock unit. This allows for tracking the serial numbers of individual packages and the cases that they are stored in. Additional information on serialization is available via Utilizing Serialization.
- Asset Tracking - DEACOM offers an asset tracking feature that is designed to track containers, typically containing Finished Goods (e.g. totes, tanks, bins, or rail cars), from the time of sale to the customer, while the customer has the container at their facility, and culminating at the time of return. This is extremely useful for companies that charge customers fees for using and/or storing containers. Prior to using the asset tracking feature, the appropriate Item Master records must be created and existing Item Master records must be modified for use in the tracking process. Additional information on asset tracking is available via Utilizing Asset Tracking.
Generating inventory reports
The Inventory Reporting pre-filter is used to search for one or more Parts or Lots that meet pre-determined selection criteria. For descriptions on the options available in the pre-filter, refer to the Inventory Reporting page. To generate an inventory report:
- Navigate to Inventory > Inventory Management.
- Complete the pre-filter as desired. Pay particular attention to both the "View" and "QC Status" pick lists as the inventory and QC segment selected here will greatly affect the report results.
- Click the "View" button to generate the report. Double-click the column headings to sort the results or, depending on the report selected, double click a line to get more granular reporting.
Note:
Understanding the reporting hierarchy
Consider the Inventory Reporting pre-filter a command center for all inventory evaluation, editing, and researching. Depending on the report being generated, users can drill into a specific line to get more information, which is called the report hierarchy. For example, if running an "On Hand" report, users can double click a line to open the "Lot Summary" report for that item, then double click any resulting line to open the "Lots" report for the selected Lot.
Additionally, many of the inventory reports contain buttons to allow for moving and adjusting inventory that is being viewed. This is advantageous for the user as working with a specific piece of inventory from the grid will allow DEACOM to fill in necessary fields for those inventory transactions, reducing room for error. To better understand how DEACOM presents multiple levels of inventory evaluation, review the following scenario:
- Part FINI8 is located in the Philadelphia Facility.
- An "On Hand" report is generated, which is a top-level summary, by item number, showing total quantity on hand. Running this report will show the total quantity inventory on hand in the Philadelphia Facility for the FINI8 Part Number. Assume there is a quantity of 2,000,280 of FINI8 currently on hand in the Philadelphia Facility.
- Notice the user does not have the ability to use the "Move Inventory" button from this report. If the user drilled down one level deeper, either by double clicking or using the "View Lots" button, the "User Lot Summary" report is generated. This grid populates the 2,001,280 units of FINI8 by User Lot, showing 3 different User Lots of that Part in the Philadelphia Facility.
- While the "Adjust On Hand" button is functional, when attempting an adjustment, the user will not be at the required level of detail for DEACOM to be sure which specific Lot they are interested in. An empty "Location Type" and "Location" tell the user he/she needs to keep drilling in.
- The "View Detail" button from the "User Lot Summary" report will bring the user to the "System Lot Summary" report. As the name implies, this sums the quantities of the System Lot in question.
- Notice the "Move Inventory" button is still not active. Users can continue to dive deeper into inventory reports from this point to see how many different segments of System Lot 3807 exist in the warehouse.
- Clicking on "View Detail" launches the "Lot Summary - Attributes" report.
- The FINI8 Part has two segments of System Lot 3807: One in Bin6, the other in Bin7. At this level of specificity, the "Adjust On Hand" button opens the Adjust On Hand form with the "Location Type" and "Location" fields pre-populated and grayed out. DEACOM knows exactly what piece of inventory, based on System Lot and Location, the user is trying to adjust. This inventory is at the most specific level it is set up for, and because of this, the user can adjust this Lot as needed without having to dig through pick lists and selection fields as they might have been doing from a few reporting levels higher up.
- For the first time, a user can execute an inventory move from this form. Clicking the "Move Inventory" button will present the Move Inventory form with all the Lot and Location information pre-populated because of the report’s level of inventory specificity. Notice the difference in the Move Inventory form presented from the specific inventory "Lots" report versus opening the form from the Inventory menu.
Understanding the flow of Inventory Management reports and how User Lot and System Lot specificity impact what a user can and cannot do with inventory is vital to successfully navigating through the reports available in the system. One of the most important and useful reports for any user looking at inventory is the "Lots" report. From this report, a user can move, adjust, and change segments of inventory. It presents System and User Lot detail that can present the quantity and values of each piece of inventory.
Reporting on Inter-Company Transfers and transferred Lots
Sales > Order Reporting provides visibility to what Inter-Company Transfer are in the system. By manipulating the "Status" pick list, the user can look at orders due to ship, orders that have shipped, and orders in-transit.
Additionally, there is value in seeing what Lots are between Facilities on a transfer. By switching to Inventory Management reports, the user can use the "View" pick list to select “In-Transit” inventory. The results of this inventory report show the normal things the user might expect, like Part Number, Quantity, and Lot. Additional fields available on this report that prove useful include the "Postref" column, which allows the user to see what the transfer order number is and the "Location" column, which shows the user the final Location the inventory was in before it was shipped.
Reporting on Master Lots
The Inventory Reporting pre-filter includes a "Master Lots" report that displays a detailed list of all the Master Lots in inventory. The “View Detail” button available to this report can then be used to display the detail of all the individual Lots that are tied to the Master Lot. To generate and use this report:
- Navigate to Inventory > Inventory Reporting and select a report type of "Master Lots".
- Under "View", select the segment to display records for.
- Click “View” to generate the report.
- Find and select a Master Lot then click “View Detail” to generate a "Lot Summary" report of the items belonging to the Master Lot.
Using the "History" report
The "History" report shows detailed inventory transactions, from the earliest records to the selected end date. It is typically filtered by a specific item number and displays running on hand quantities. The balance column is calculated based on the records selected by the pre-filter, and not the entire history of the Part. System admins can configure this grid to report who did the transaction, if that information valuable.
This report also contains two columns titled "Disposition" and "Disposition2". When the Post Ref column value begins with PJ (purchase-related transactions), the Disposition column displays the Vendor name and the Disposition2 column is empty, when the Post Ref column value begins with SJ (sales-related transactions), the Disposition column is the Bill-to name and the Disposition2 column is the Ship-to name.
The "History" report allows users to drill into a specific transaction to view details of that line. For example, drilling into an inventory move of 15 lb of RAW1 could display that it was moved from a location called None to location Tank 5.
Using the "Lot Tracking Implosion" report
The "Lot Tracking Implosion" report shows all transactions where a specified Lot was used. When filtered for a specific Lot, the report will show all Purchase Orders and inventory moves from QC where the Lot was created in DEACOM, all inventory moves, all inventory adjustments, all Jobs to which the Lot was issued, all products made on that Job, and all customers to whom the products were shipped, as well as all current on hand inventory that contains that Lot. Each line of this grid is actionable. The user can drill into each Sales Order, inventory adjustment, or on hand report as needed. This report is extremely useful in case of a product recall.
Usage Reporting
The Usage report shows starting and ending balances for a period of time, incoming and outgoing transactions in units, with calculation of Days to Reorder and inventory Turns, by Part Number. Lot value adjustments do not appear in this report. The usage report is useful for identifying Parts that should be inactivated because they have not been used over a period of time. The usage detail report displays a breakdown of inventory transactions by action, with the inventory ins and outs of those actions. Examples of actions included in the report are: Receipts on Purchase Orders, shipments on Sales Orders, produced materials on Jobs, production usage materials issued to Jobs, and inventory adjustments.
Inventory Adjustments and Actions - General Ledger Impacts
The following table lists the general ledger impacts of the various inventory actions and adjustment transactions in Deacom.
|
Inventory Action |
General Ledger Impact |
|---|---|
| Adjust to Standard | Yes |
| Adjusted for Unreceipt | Yes |
| Cycle Count | Yes |
| De-Issue from Master Lot | Only if inventory account changes |
| Inventory Move | Only if inventory account changes |
| Issue from Scale | Yes |
| Issue Inventory | Yes |
| Issue to Floor | Yes |
| Mass Inventory Move | No |
| Master Lot Moved | Only if inventory account changes |
| Modified Lot | No |
| Order Received | Yes |
| Order Un-Received | Yes |
| Relieved Inventory | Yes |
| Removed from Master Lot | Yes |
| Reserved Inventory | No |
| Shipped Order | Yes |
| Staged | No |
| Transfer Received | Yes |
| Transfer Shipped | Yes |
| Transfer Un-Received | Yes |
| Un-Finish Job | Yes |
| Un-Relieve Job | Yes |
| Un-Reserve | No |
| Un-Ship Order | Yes |
| Un-Shipped Order | Yes |
| Un-Staged | No |
| Value Only Adjustment | Yes |
FAQ & Diagnostic Tips
How do I clear a negative lot?
The property that controls whether or not a lot can go negative is found on the Item Master. To clear a negative lot from inventory, follow the steps below:
- Run a Lots report from Inventory > Inventory Management, set the View to "Inventory".
- Within the report, select the negative lot and then click the "Adjust On Hand" button on the report.
- Add a positive quantity to inventory to offset the negative quantity and click the "Apply" button.
- Re-run the Lots report to verify the negative lot was cleared.
Note: Ensure the on hand quantity for the part number is still accurate. Also, if you do not want this part to have negative lots in the future, update the "Negative Inventory" field in the Item Master.
Can I run a Lots Summary report to summarize the catch weights of the items within a lot?
No, but you can run a Lots report and modify the grid to contain the "fi_catchwgt" field. Then, use the "Subtotal" button on the toolbar to subtotal by Part number and lot number to get the total catch weight of items within a lot. Note that the On Hand report contains the total catch weight of all parts in the "totwgt" field.
Why is the “Adjust On Hand” button grayed out on some inventory reports?
You can only adjust the quantity on hand from certain reports within the system. The best place to adjust the on hand quantity is the Lots report, set to a view of Inventory, because it provides the most granular results.
Tip: The "fi_type" (Allocation Type) field on the "dtfifo" (Inventory Transactions -In) table indicates the inventory segment involved in the inventory transaction recorded in the table. This field may be added to the grid layout in various reports throughout the system to help troubleshoot or analyze inventory movements and transactions. The fi_type and corresponding inventory segments are listed in the table below.
|
fi_type |
inventory segment |
|---|---|
| 'blank' = | Inventory |
| icxfer = | In Transit |
| pending = | Pending |
| quarantine = | Quarantine |
| sal-reserv = | Reserved |
| special = | Special Order |
| staging = | Staging |
| job = | WIP |
| dsd = | DSD (Direct Store Delivery) |
How does staging get entered in the "Action" column in a lots report?
Using Inventory > Pre-staging or Inventory > Inventory Final staging will put the Action as Staging (Pre-staging) or Staging (Final staging). If items are not needed, they can be de-issued using Inventory > De-issue\Un-reserve.
I am trying to adjust some lots out of stock using a date from last month and I am receiving an insufficient inventory message. How can I backdate these adjustments?
You will not be able to backdate the adjustments if there are transactions on the lots that have dates after the date you are using for the adjustments. Note that if you backdate a Lots report, it will return results from that point in time; it will show you what you had at that point. Run a History report to find the last time the lot was transacted against to see where it is currently and adjust it from there.
I have found an entire category of items that is improperly valued. How can I adjust these values all at once?
You can use the Inventory > Price Updates function to update the standard cost of the items, then run the Inventory > Cost Updates function to apply these values to the lots currently in inventory.
The Lots report shows that I have items reserved but I don't know to what they are reserved because the Post Ref is an "IJ-". How do I un-reserve these items?
Run the Inventory Management "Lots" report for Reserved items. Select the line for the "IJ-" Post Ref in question. Click on the "View All Fields" button in the toolbar and find the column labeled "Allonum". This will give you the transaction number to which these items were reserved. To un-reserve the items, go to Inventory > De-issue/Un-reserve, select the Type, and enter the transaction number. Select the line and click "Modify" or "De-issue All".
How can I find who modified a particular Item Master?
You can view the changes to an Item Master by going to Inventory > Item Master > enter your part number >View > click the View modifications to Icon on the tool bar. Please note that changes made to the Item Master will not automatically update existing open Sales Orders or Purchase Orders.
I am getting a Please Note message "Item has inventory on hand and it's active status cannot be changed." when trying to inactivate an item, but I checked and I don't have any inventory. What is the problem?
Run an Inventory Report with Report Type set to Lots and View set to All. There is inventory that is in special status like QC, WIP, Reserved, etc.
Should all items in inventory have an expiration date?
If the product has a shelf life, all inventory for that item should have an expiration date. This will prevent inventory from being used after shelf life and prevent reserving issue due to expiration field. Note that within Inventory > Options contains a "Lot Expiration Calc" field which may be used to further calculate the expiration date for lots that produced on production jobs in the system.
Can I track company owned totes that ship to customers?
Yes, review track customer inventory flag on the properties tab.
Can I make items obsolete without making them inactive?
Below are some ways to mark items obsolete or prevent items from being used.
- Create Obsolete category and assign the parts to that category. Will appear on first screen user sees in Item Master.
- Change the properties tab and remove, Saleable, Purchaseable, Manufactured, Make to Order, Include on MRP options, and Allow on BOMs. This will prevent from appearing in selection lists and MRP.
- Add Obsolete to the beginning of the description field.
- Enter OBSOLETE in Notes field on General 1 tab.
- Add SO and PO pop-up THIS ITEM IS OBSOLETE. User will get pop-up if selected on orders.
How can I import a User field onto the Item Master?
Importing data into DEACOM from any DEACOM defined format is not recommended. Before performing any import, fully test the import in your training environment with a current copy of your data. You will need to backup production databases before importing data.
Calculations for imported data will not fire and all checks, including defaults, will be bypassed. To reapply calculations and checks, each piece of data must be re-saved individually after import in the new location.
Any technical support assistance to fix failed data imports is considered a billable project.
Any dmprod fields can be created or modified from Inventory > Price Updates by selecting Spreadsheet in the 'Change from' field and a spreadsheet to apply changes from in the 'Spreadsheet' field. A separate import spreadsheet must be created for each data type.
All other User fields can be imported to the Item Master at Tools > Import Data, but must first be built as an import spreadsheet. Again, a separate import spreadsheet must be created for each data type. Below are two examples of import spreadsheets.
Field Type - Pick list example
| A | B | C | D | |
| 1 | d2_recid | d2_value | d2_d1id | |
| 2 | 1 | 1 | 1 | |
| 3 | ||||
| 4 |
Column B was formatted as text.
| A | B | C | D | |
| 1 | d2_recid | d2_value | d2_d1id | |
| 2 | 1 | UF Text | 52 | |
| 3 | ||||
| 4 |
- d2_recid is the part number pr_id
- d2_value is the pick list id or actual text for user field
- d2_d1id is the d1_id for the user field
Setting up an import spreadsheet:
- For the d2_recid field: Find the part number pr_id by navigating to Inventory > Item Master > View Part(s) and clicking the 'View All Fields' button on the top ribbon. The pr_id will be used as the d2_recid field value.
- For the d2_value field: Find the user field d2_value. If the field type is pick list, navigate to Tools > Edit User Fields > Modify User Field > Edit Pick List and click the 'View All Fields' button at the top ribbon. The d3_id will be used as the d2_value. If the field type is any other type, the d2_value is the actual text you want displayed in the User field. If unsure about which value to use, please see the Queries to Run for Viewing Data section below.
- For the d2_d1id field: Find the user field d1_id by navigating to Tools > Edit User Fields an clicking the 'View All Fields' button on the top ribbon. The d1_id will be used as the d2_d1id field value.
- Save and close spreadsheet.
Importing your spreadsheet:
- Navigate to Tools > Import Data
- Source file field: Select your import spreadsheet.
- Source table field: Select your worksheet within the spreadsheet.
- Destination table: Select dtd2. After selecting a Destination table, the Destination field on the right side of the Import Data form will populate.
- Map Source: For each Destination field you want to map source data to, click that field and then the 'Map Source' button.
- Click the 'Import' button when done mapping source fields to import data.
Queries to Run for Viewing Data:
If you are unsure about which information to use for a spreadsheet, these queries may help you.
To find inventory items where specific user field is empty (d1_id = X): Navigate to System > Query Tool > Enter 'SELECT pr_codenum FROM dmprod WHERE pr_id NOT IN (SELECT d2_recid FROM dtd2 WHERE d2_d1id = X)'>Run Query.
To find existing user fields on inventory item when pr_codenum is X – to view sample data: Navigate to System > Query Tool > Enter ' SELECT pr_codenum, d1_title, d2_recid, d2_value, d2_d1id FROM dtd2, dmd1, dmprod WHERE d1_table = 'dmprod' AND d1_id = d2_d1id AND d2_recid = pr_id AND pr_codenum = 'X' '>Run Query.
How can I determine what materials are in staging, for what job, and what material may need to go back to inventory?
Run a lots report with a view of "Staging" and add the following expression to a user-defined column in the grid: SQLVAL("st_jobnum","dtstaging","st_figroup = " + ALLT(STR(grpnum,15,0)),"S")
This will allow users to make the determination of what material should remain in staging and what material should be placed back in inventory.
How do I see blanks on my reports but 0.00 for these same columns when exporting to Excel in web based versions of DEACOM?
In web based versions of DEACOM add a "Z" to the format field via Grid Layout to those columns you wish to have display 0.00 in Excel.